

Have you ever hit these frustrations?
- You switch to a new computer and have to painstakingly reconfigure your whole development environment, time-consuming and tiring.
- You want to write code anywhere on an iPad or a thin-and-light laptop, only to find the performance too weak.
- Your local project has too many dependencies, making a mess of your local setup.
If any of these scenarios ring a bell, then it's time to have a development environment of your own, hosted in the cloud.
Today, we'll guide you through using Tencent CloudBase Run (Cloud Hosting). In just a few steps, you can set up a fully functional, pay-as-you-go, never-offline code-server (i.e., the web version of VS Code).
Who it's for: this suits temporary remote development needs, or devices where VS Code can't be installed (such as an iPad). Users can access the service through a browser and do their coding there.
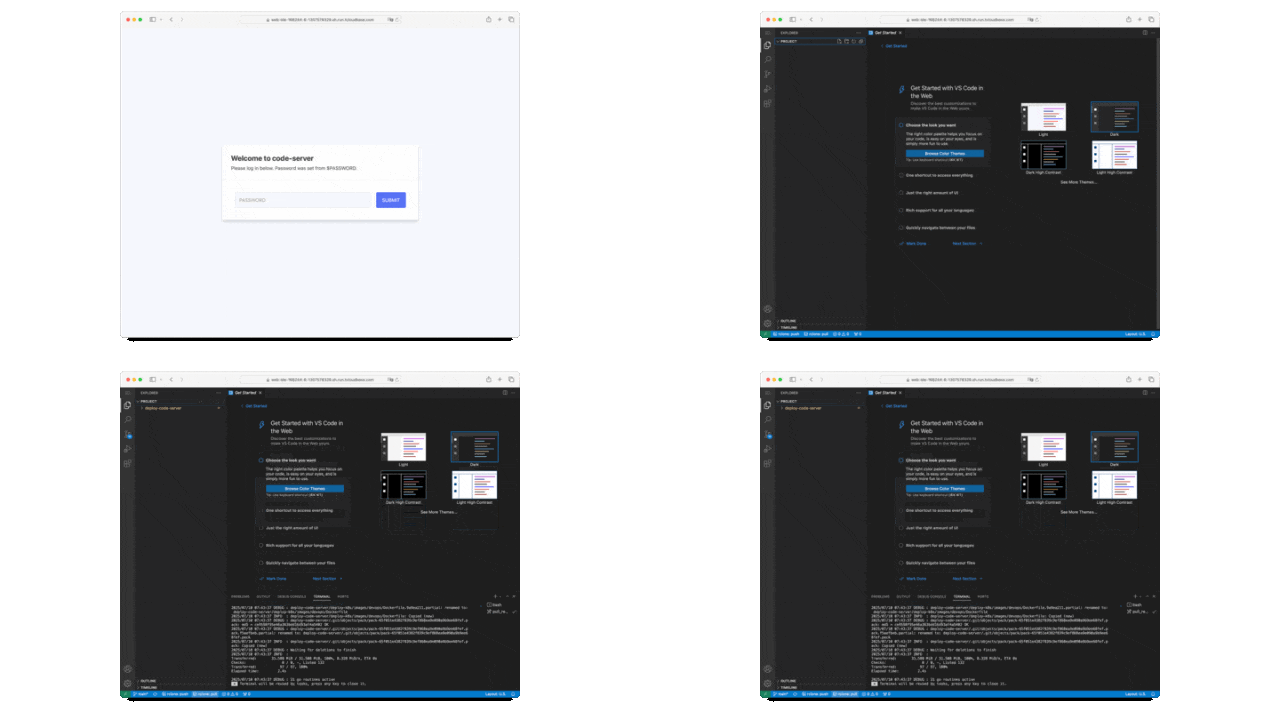
Showcasing the result
No matter where you are, with any device, you only need to open a browser to immediately step into the fully configured development environment you know so well. When you take a break, it automatically goes to sleep and incurs no charges.
The solution: CloudBase Run + Object Storage = elastic compute + persistent storage
We'll use a powerful combination to build this cloud IDE:
The solution

Compute core - CloudBase Run (Cloud Hosting)
It will run our code-server application. We don't need to worry about servers, operations, or scaling. CloudBase Run automatically starts the service based on incoming traffic and scales it down to 0 when idle, achieving maximum cost efficiency.
Persistent storage - Object Storage (COS)
CloudBase Run is stateless, which means data is lost when containers restart. That's precisely the Serverless design philosophy! We'll use object storage COS to keep our code and workspace configuration safe and sound.
The connecting bridge - rclone
A powerful cloud-storage synchronization tool that seamlessly connects our CloudBase Run container with object storage COS.
Architecture and flow
Before diving into the operations, let's spend a minute understanding how it works.
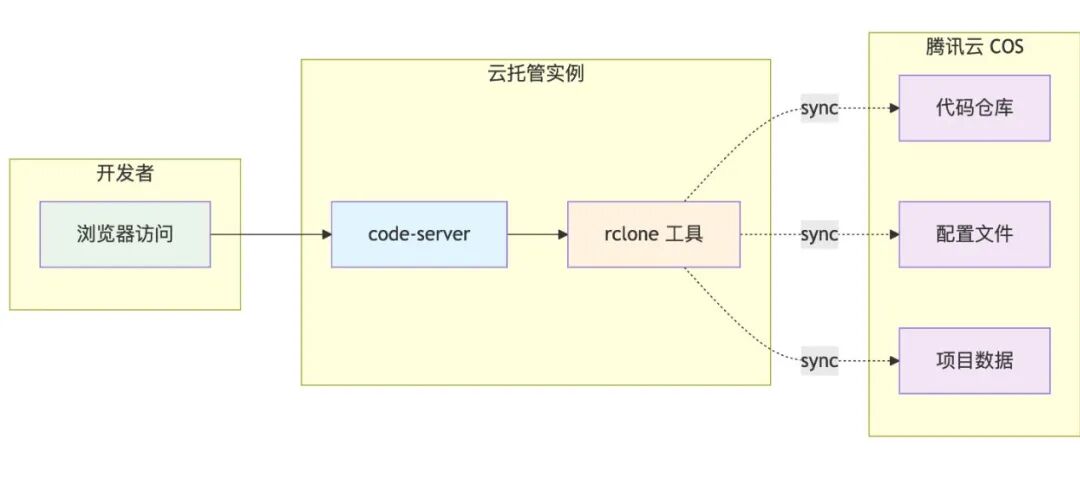
Flow breakdown:
1. User access: You access the default domain provided by CloudBase Run through your browser.2. IDE experience: code-server runs inside the container, so in the browser you get a coding experience identical to local VS Code.3. Code sync: When you click the rclone sync button, the rclone tool inside the container fully syncs your workspace directory (e.g., /home/coder/project) to the designated bucket in object storage COS.4. Service sleep: When you stop accessing it for a while, CloudBase Run automatically scales the service down to 0 and stops billing. Your code is safely stored in COS.5. Service wake-up: When CloudBase Run receives a request and no instance is currently running (already scaled to 0), it quickly spins up a code-server container instance to handle your request.
Hands-on walkthrough: build your cloud IDE in three steps
Ready? Let's get started!
Step 1: Rapid deployment
The appeal of CloudBase Run lies in its ultra-simple deployment experience. We've prepared a Git repository containing code-server for you, so you only need a few clicks.
- Log in to https://tcb.cloud.tencent.com/dev and go to the CloudBase Run page.2. Click "Create Service" and choose Deploy via a public Git repository.3. Fill in the following info:
- Repository address: https://github.com/TencentCloudBase/awesome-cloudbase-examples
- Repository branch: main
- Port: 8080
- Target directory:
cloudbaserun/deploy-code-server
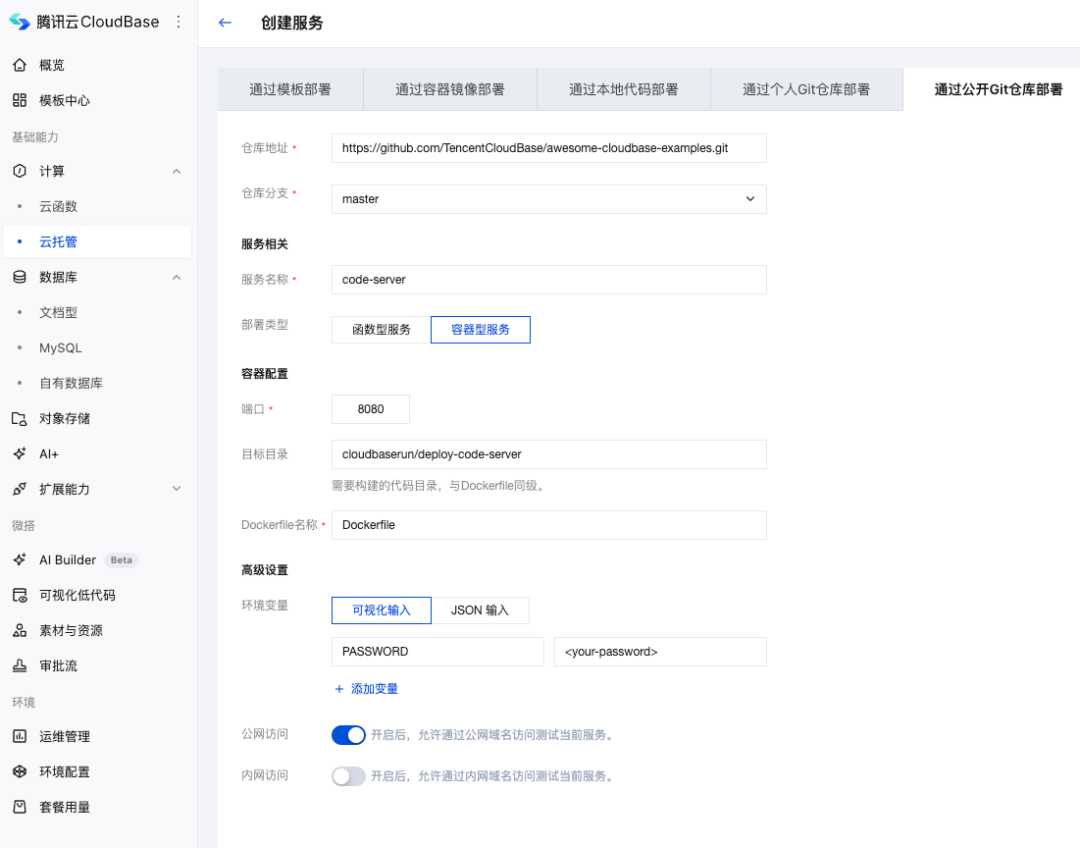 4. Click "Create and Deploy". After a moment, CloudBase Run will build and deploy
 code-server for you. Once deployment completes, access it through the default domain on the service detail page.
Tip: The example sets an access password through the environment variable
PASSWORD. You can change it to your own password under "Service Config" -> "Environment Variables", and it will take effect after redeployment.
At this point, you already have a working cloud VS Code! But that's not enough — because once the service restarts, the code you just edited will be lost. Next, let's add persistent storage to it.
Step 2: Introduce object storage COS for bulletproof reliability
1. Prepare your "data warehouse" - COS
-
Go to the Tencent Cloud COS (Object Storage) console and create a new Bucket. Remember the Region you chose, such as "Shanghai" — you'll need it later.
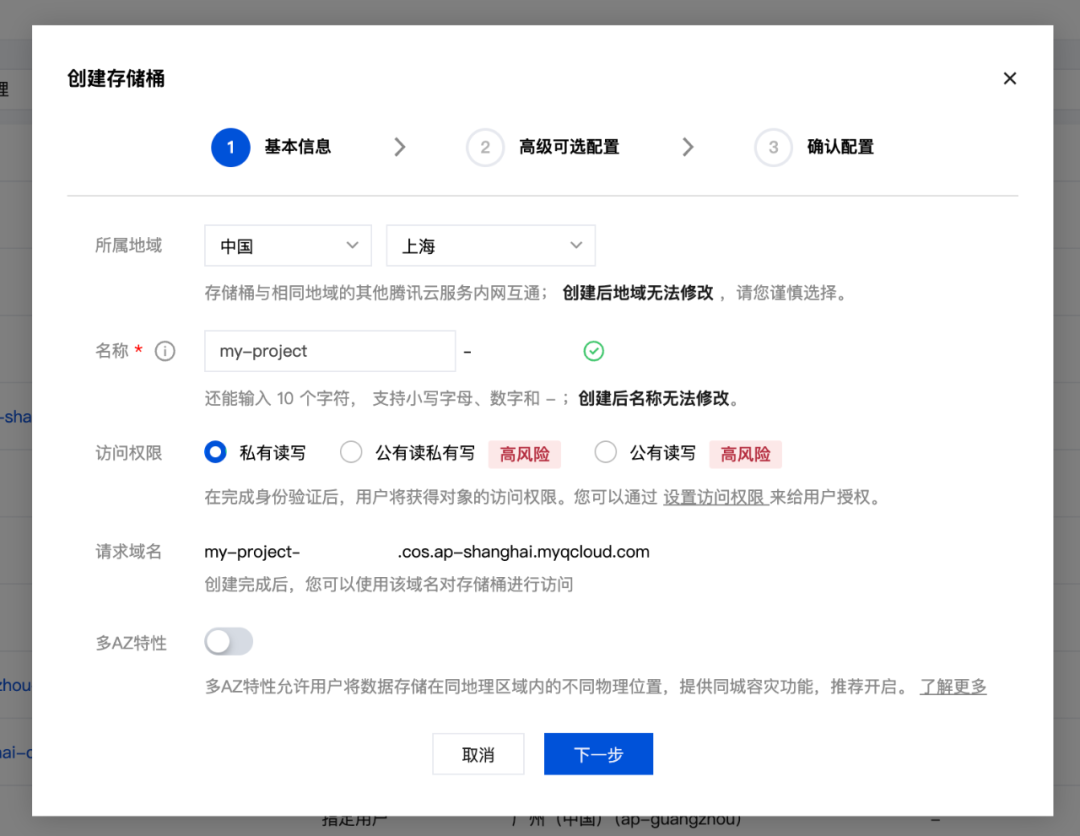
-
Go to the CAM (Access Management) console to get your API keys
<your-secret-id>and<your-secret-key>. These are the credentials that letrcloneaccess your bucket.
2. Configure the "porter" - rclone
The code-server in CloudBase Run can read and write code files in COS through rclone. The most elegant way to configure rclone is to inject the configuration into the service as environment variables.
-
Install and configure
rcloneon your local computer. (See the appendix for install steps.) -
Run the configuration command, which will guide you through creating a config that connects to Tencent Cloud COS.
rclone config
During the wizard, choose to create a new remote connection (n), name it cos (or any name you like), choose S3 as the storage type, select TencentCOS as the provider, and fill in your <your-secret-id>, <your-secret-key>, and the endpoint matching the region of your bucket (e.g., for Shanghai it's cos.ap-shanghai.myqcloud.com).
Or you can complete the configuration in one go
        rclone config create cos s3 \
        provider=TencentCOS \
        env_auth=false\
        access_key_id=<your-secret-id> \
        secret_access_key=<your-secret-key> \
        endpoint=cos.ap-shanghai.myqcloud.com \
        acl=default \
        storage_class=STANDARD
Verify that rclone is configured correctly
rclone ls cos:<some-path-in-bucket>
- Export and encode the configuration Once configured,
rclonestores the info in a local file. We need to read it and encode it in Base64 so it can be passed safely as environment variables.
        # This command finds the rclone config file, reads it, and outputs its contents to the terminal Base64-encoded
        cat$(rclone config file | sed -n 2p) | base64 --wrap=0
Copy the long Base64 string output above.
Step 3: Ecosystem integration — final configuration
Now let's return to the CloudBase Run console and wire everything together.
- Enter the detail page of the
code-serverservice you just created and choose "Update Service".2. Under "Environment Variables", add the new environment variables:RCLONE_DATA: paste the Base64 string you copied in the previous step.RCLONE_REMOTE_NAME: the name of the rclone remote connection configured in the previous step, e.g.,cos.RCLONE_DESTINATION: the name of the bucket you created in the previous step.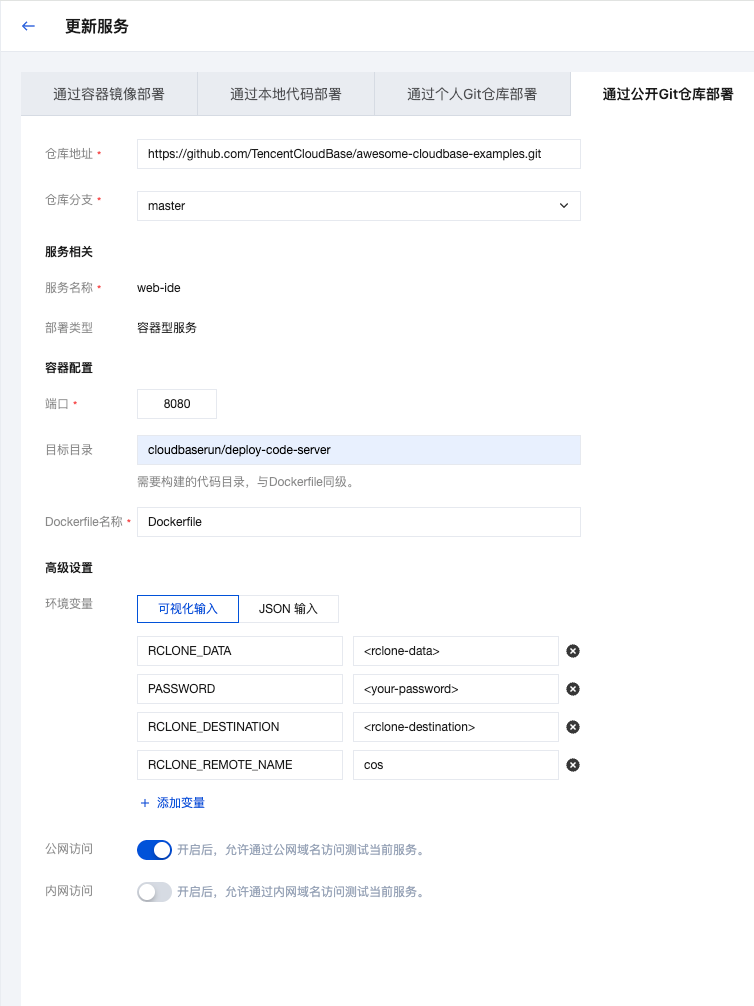 Our deployed code automatically detects these environment variables and configures
 rcloneaccordingly. It takes effect automatically after updating and redeploying the service.3. After deployment, visit your cloud IDE again. You'll notice a newrclonetool icon in the bottom status bar.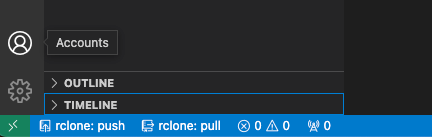 Now, after you finish editing your code, click
 rclone:push, and all your code is safely synced to your COS bucket! At the same time, you can clickrclone:pullto sync the code in COS back to your workspace.
Summary
CloudBase Run is more than just a container platform — it's an accelerator for modern application development. Whether you're an individual developer, a startup team, or an enterprise, you can quickly build, deploy, and scale your applications with CloudBase Run. Our solution demonstrates the core advantages of CloudBase Run:
1. Extreme cost efficiency: Your IDE only bills when you're using it. For individual developers or occasional use, the cost is almost negligible. No idle, no waste.2. Simple, operation-free setup: You only need to provide the code/image. From server configuration and security patches to load balancing and auto-scaling, CloudBase Run handles it all for you.3. Powerful ecosystem integration: Easily integrating object storage COS solves the persistence problem.
-
Next steps you can try:
- Integrate your commonly used development tools and plugins
- Configure automated code syncing and backup
- Explore more enterprise-grade features of CloudBase Run
-
Want your own cloud IDE right now?
- Start your cloud development journey today!
Appendix
Installing rclone
    # Use curl to download rclone
    curl -O \
        https://downloads.rclone.org/v1.70.2/rclone-v1.70.2-linux-amd64.zip
    # If the official address downloads too slowly, use the download link provided by CloudBase Run
    curl -O \
        https://tcb.cloud.tencent.com/cloudrun-tech-blog-images/web-ide/rclone-v1.70.2-linux-amd64.zip
    unzip rclone-v1.70.2-linux-amd64.zip
    sudo cp \
        rclone-v1.70.2-linux-amd64/rclone /usr/bin/
    sudo chmod \
        755 /usr/bin/rclone
    # Verify rclone is installed successfully
    rclone --version
The "stateless" CloudBase Run
CloudBase Run practices the Serverless design philosophy: separating compute from state.
-
Stateless compute layer (CloudBase Run): handles the logic. Because it's stateless, it can be freely replicated, destroyed, and moved, enabling rapid elastic scaling and fast failure recovery.
-
Stateful data layer (COS/DB): stores the data. These are highly available, highly reliable professional services.
Through this separation, the applications we build become more robust, more elastic, and more aligned with the architectural thinking of the cloud-native era.
Hands-on guide to building a permanently running personal cloud drive - CloudBase Run in practice

Goodbye to tedious API glue code! I built a powerful AI workflow engine with CloudBase Run + n8n