

As a product manager and a World of Warcraft player, I have never really written code. Recently, AI coding and Vibe Coding concepts have been booming, so on a whim I decided to try them out for myself — and they turned out to be surprisingly good.
In my spare time, using a tool combination of CodeBuddy + Cloud Development AnyService + OrcaTerm + Lighthouse, it took me less than about 1 hour to build a basic demo mini program based on the World of Warcraft API from scratch — with zero coding background, all in the cloud. The whole process was extremely simple and smooth.
One thing to keep in mind: you must be able to clearly state your requirements to the AI in detail, avoiding vague, one-line descriptions.
Preface
As a World of Warcraft player, I have long been troubled by one small problem: how to quickly find out my class's best-in-slot gear so I can go grind for it? There didn't seem to be any tool like that — in the past, I had to search game websites and databases myself, and since each class is different, it was very troublesome. At the same time, as an internet professional, I really wanted to try writing a query tool myself, but since I had no coding foundation, I had to give up on the idea.
However, with the arrival of the era of large AI models, the rise of the Vibe Coding concept, the recent launch of CodeBuddy, and the release of the AnyService solution jointly offered by Cloud Development and Lighthouse, I felt a sudden urge. I happened to have a Lighthouse instance on hand, so I decided to try it out for myself. Without further ado — Lighthouse, start up!
Overall Workflow
1. Mini Program Registration
Since I wanted to experience building a mini program, of course I had to register one first. (I won't go into detail about the mini program registration process here.)
2. Cloud Development AnyService
Tencent Cloud Development CloudBase's latest access service — with just a simple configuration, it connects the mini program to the deployment of backend services, and with just a single line of code, you can directly invoke the backend services. >> Reference documentation
3. Lighthouse and OrcaTerm
Lighthouse can serve as the cloud server for deploying the mini program's backend services, while OrcaTerm makes it very convenient to operate and manage the Lighthouse server. Both greatly simplify traditional development and operations steps, making them a great fit for a tech novice like me.
4. VS Code and CodeBuddy
CodeBuddy, Tencent's newly launched AI coding IDE, generates the code you need as long as you describe your ideas to your buddy CodeBuddy in as much detail as possible. In this case, I used it as a plugin within VS Code (Microsoft's code editor).
5. World of Warcraft Game API Documentation
Blizzard Battle.net Developer Portal. Since I wanted to tinker with World of Warcraft–related things, I naturally needed the World of Warcraft API. (I won't go into detail about registering a client for the World of Warcraft API here.)
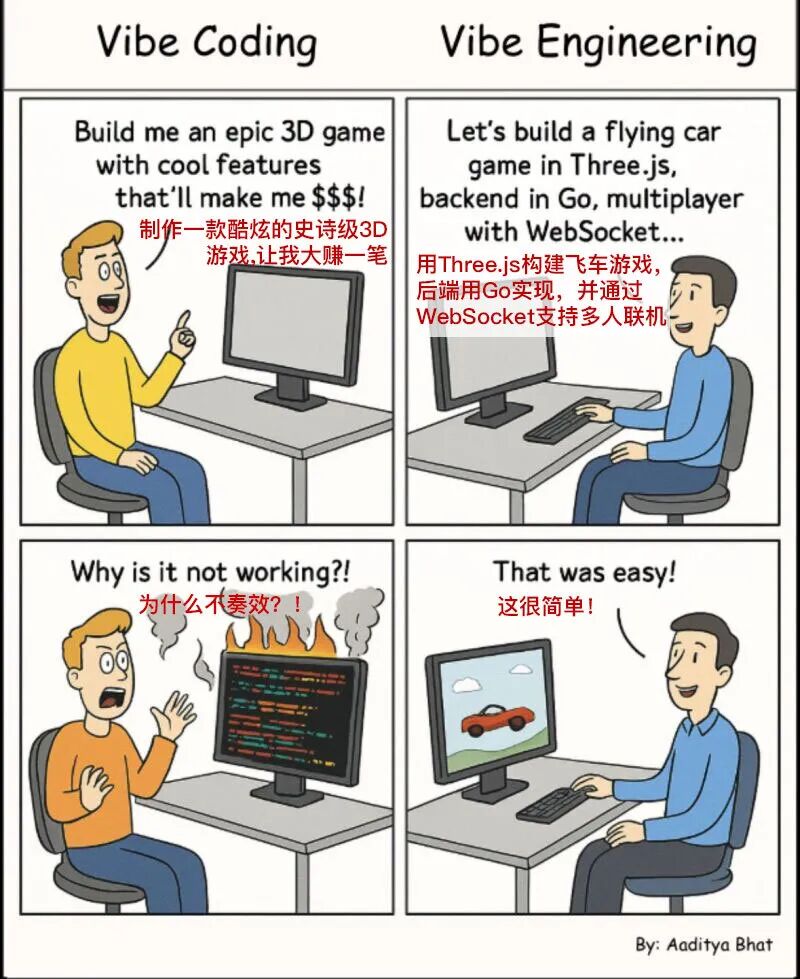
Next, I'll walk you step by step through building this mini program, giving you an immersive Vibe Coding experience. Vibe Coding, literally translated into Chinese as "ambient programming," is about engaging in dialogue-driven interaction with AI, letting us immerse ourselves in a ritualistic coding session and enjoy a fast, silky-smooth coding atmosphere. We don't need to care at all about how the code is actually implemented — leave all that implementation logic and low-level detail to the AI. All we need is to loop through "issue a command => see the result => make adjustments => see the result again."
Throughout the whole process, you should avoid feeding the AI a single unrealistic, vague sentence. Moving from vague descriptions to precise instructions — AI is not meant to replace human thinking, but to help us become better engineers and our most capable assistant and partner.
Step-by-step Reference
1. Launch VS Code and debug the World of Warcraft API backend code locally
The purpose of this step is mainly to read the World of Warcraft class list, which serves as the core data for this mini program.
As I mentioned earlier, I mainly asked the AI coding plugin CodeBuddy inside VS Code to help me write code. So first, I opened VS Code, searched for CodeBuddy in the plugin marketplace, and installed it.
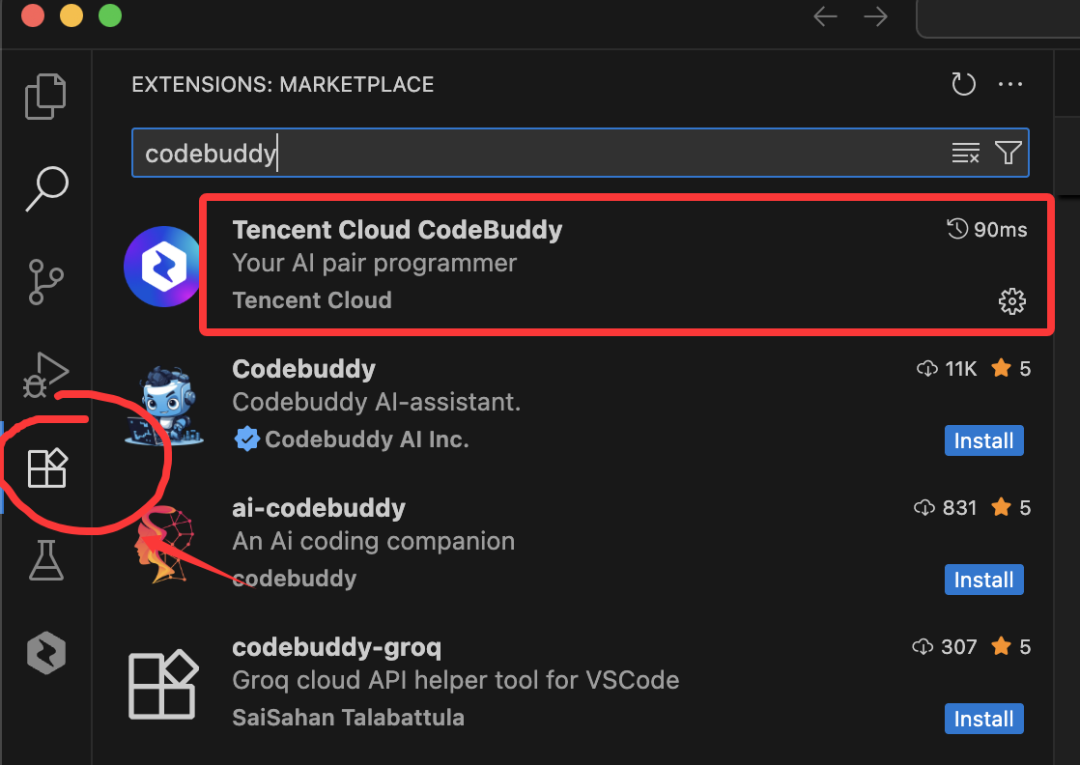
Installing CodeBuddy in VS Code
I found the World of Warcraft API documentation, but since I had never written code, I naturally couldn't understand the documentation — it looked daunting. Fortunately, my buddy CodeBuddy could help me solve all my problems.
All you need to do is tell CodeBuddy what you want to do:
1) Based on the World of Warcraft API documentation, I want to obtain an access_token and generate a piece of code. (Sample prompt)
CodeBuddy will automatically generate a piece of code for you — you just need to replace the API key and API secret in it.
2) Using the access_token obtained from the GetAccessToken file, call the World of Warcraft interface to get the class list. (Sample prompt)
At this point, CodeBuddy automatically analyzes the previous file and continues writing a new piece of code.
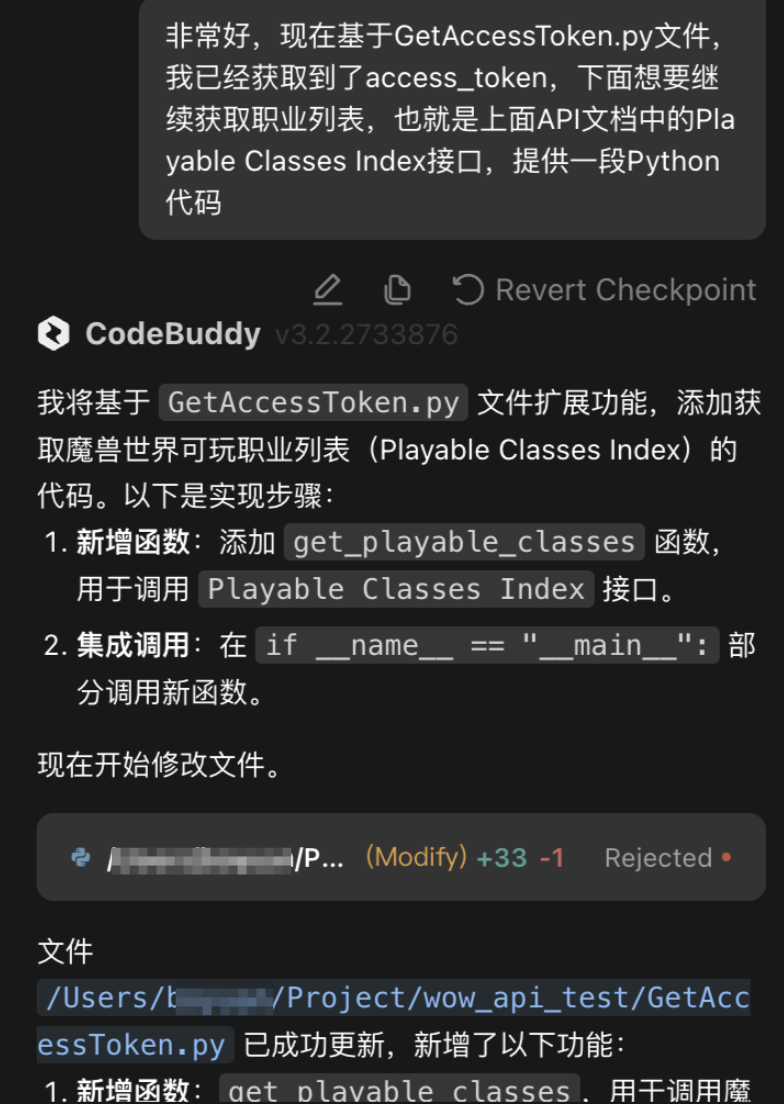
Example of giving a command to the AI
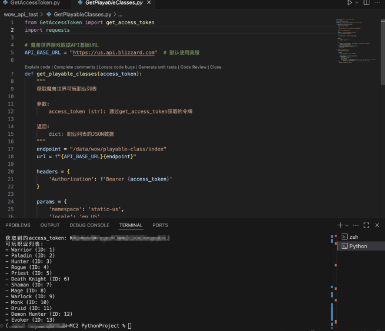
Example of the generated code snippet
Watching lines of code pour out filled me with a sense of accomplishment. At this point, the basic backend interface was done debugging!
2. Launch WeChat Developer IDE to generate the mini program project
Now that we've obtained the class list data, we move on to the actual mini program generation phase and start writing the interaction page code for the mini program. This is where WeChat DevTools comes in. As before, we'll still rely on AI to help generate the code.
WeChat DevTools now also supports AI-generated templates when creating a mini program project. Since this was just a test of the interface access, I auto-generated a very simple template through dialogue as well:
1) I now need to create a test project that provides a button. Clicking it displays the World of Warcraft class list.
2) Below the button, place a display box that presents the returned data in a table format. (Sample prompt)
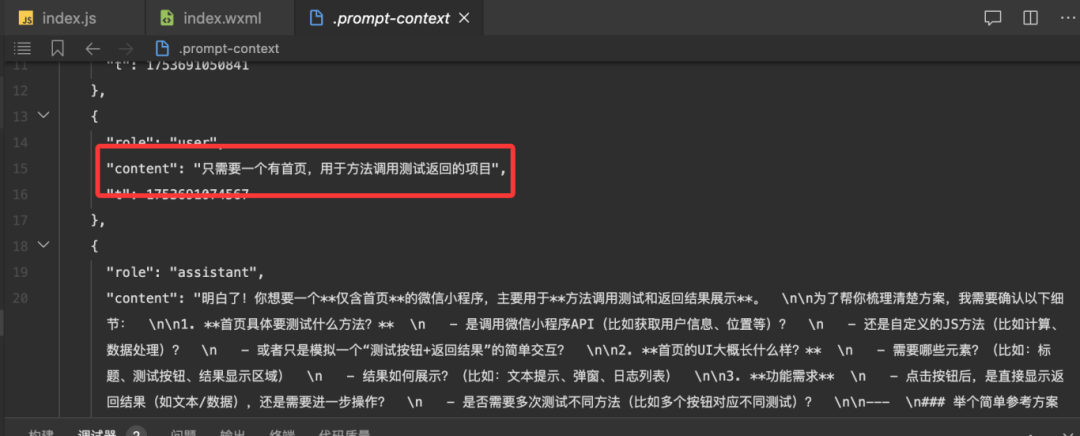
Sample prompt
Based on the prompts I provided, the IDE quickly analyzed my requirements and generated a project that met them, and the subsequent code could still be modified.
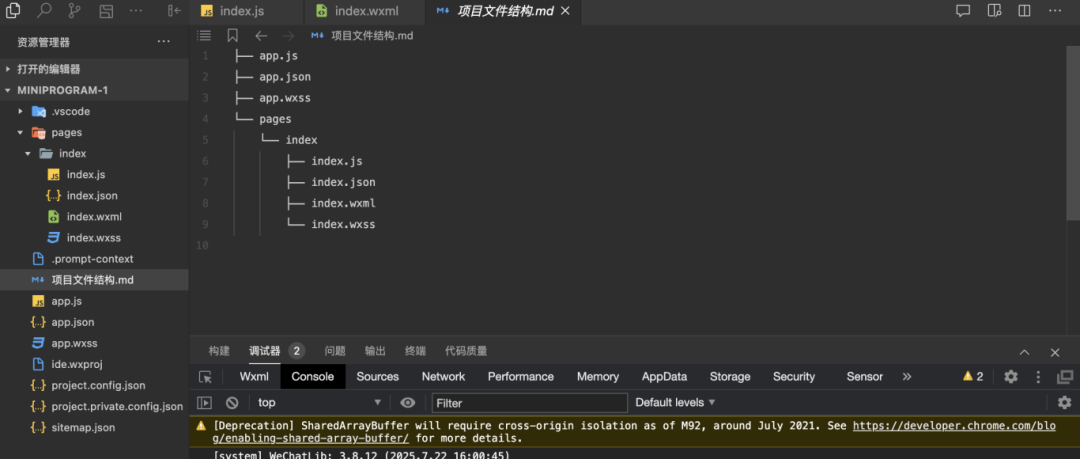
Example of generated project files
At this point, we have both the backend logic and the front-end code — equivalent to finishing the food prep. Now it's time to cook and serve the final dish. We first need to deploy the backend logic to the cloud server and get it running.
3. Launch Lighthouse and configure the AnyService
When it comes to choosing a cloud server, the advantage of Lighthouse is that it's simpler and easier to use — I don't need to understand the advanced concepts and features of traditional cloud servers.
First, purchase a Lighthouse server instance on the Tencent Cloud official website; first-time buyers can also take advantage of promotional discounts on the website. After placing the order, a Lighthouse instance will be automatically created. Then, following the AnyService documentation from Cloud Development, configure the AnyService. This step mainly ensures that the backend logic we deploy later can be quickly connected to the mini program.
Note: AnyService currently only supports the Shanghai region, so the Lighthouse instance should also be selected in the Shanghai region.
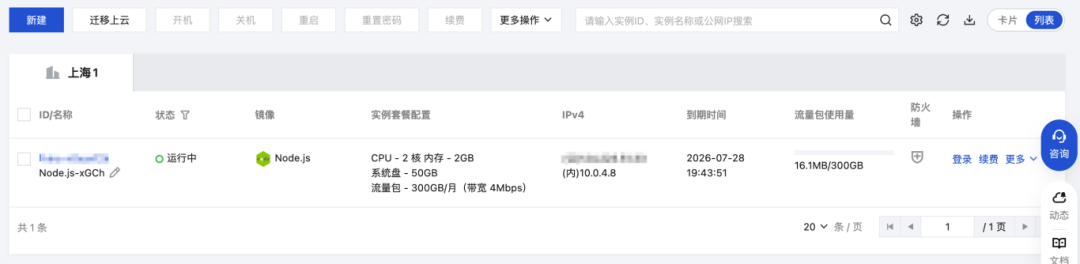
Lighthouse server instance
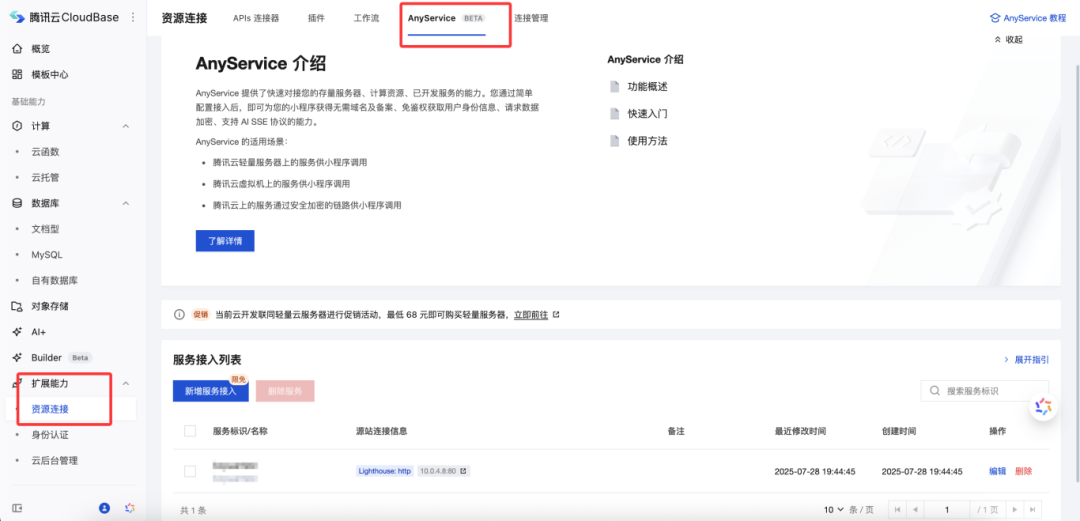
Configuring the AnyService
Referring to the AnyService test code, debug it in WeChat DevTools:
```js
     // 在调用前,或在小程序 onLaunch 中初始化环境wx.cloud.init({    env: 'test-xxxxx', // 这里为 CloudBase 的环境 ID    traceUser: true,}) const result = await wx.cloud.callContainer({    "path": "/",    "header": {        "X-WX-SERVICE": "tcbanyservice", // 固定为 tcbanyservice        "X-AnyService-Name": "lh", //  X-AnyService-Name 中填入 AnyService 服务标识,从「腾讯云开发平台 - AnyService」获取服务标识        "content-type": "application/json",    },    "method": "GET",})console.log(result);
Test reference code sample
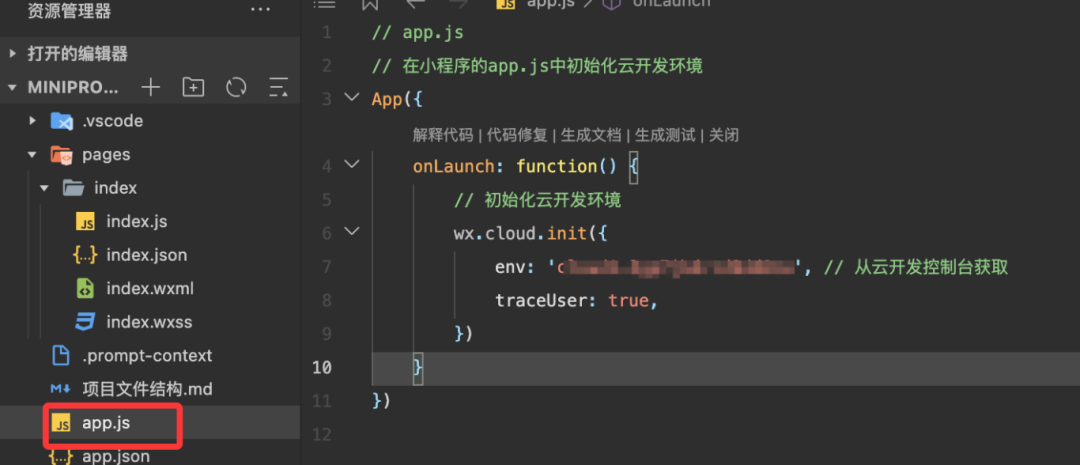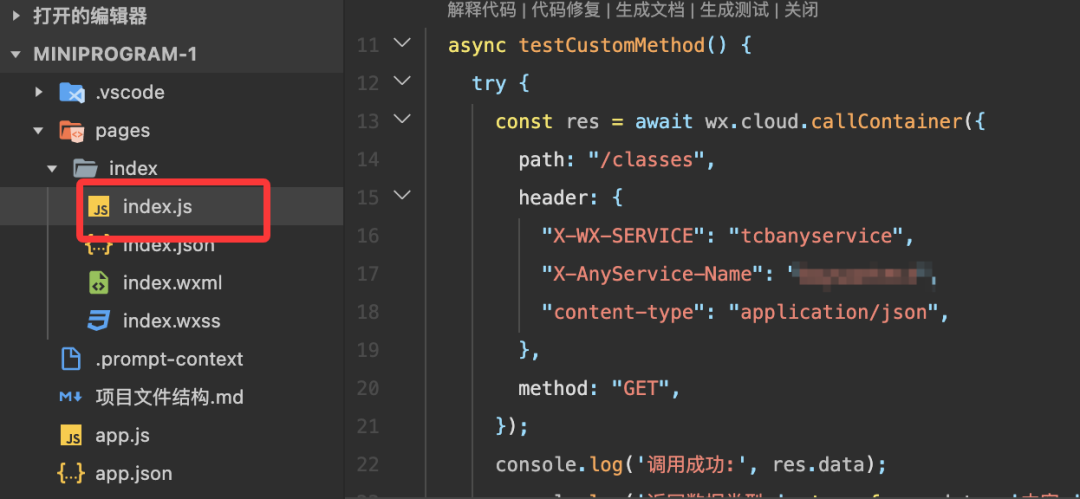
Example of the actually modified code file
**4. Deploy the local World of Warcraft API to Lighthouse**
Once the server is running, we need to deploy the code we initially used to fetch World of Warcraft data to the server. This time, keep asking CodeBuddy for help. **Continue telling CodeBuddy what you want to do:**
**I want to deploy the local project to the cloud using Node.js. Generate a piece of code. (Sample prompt)**
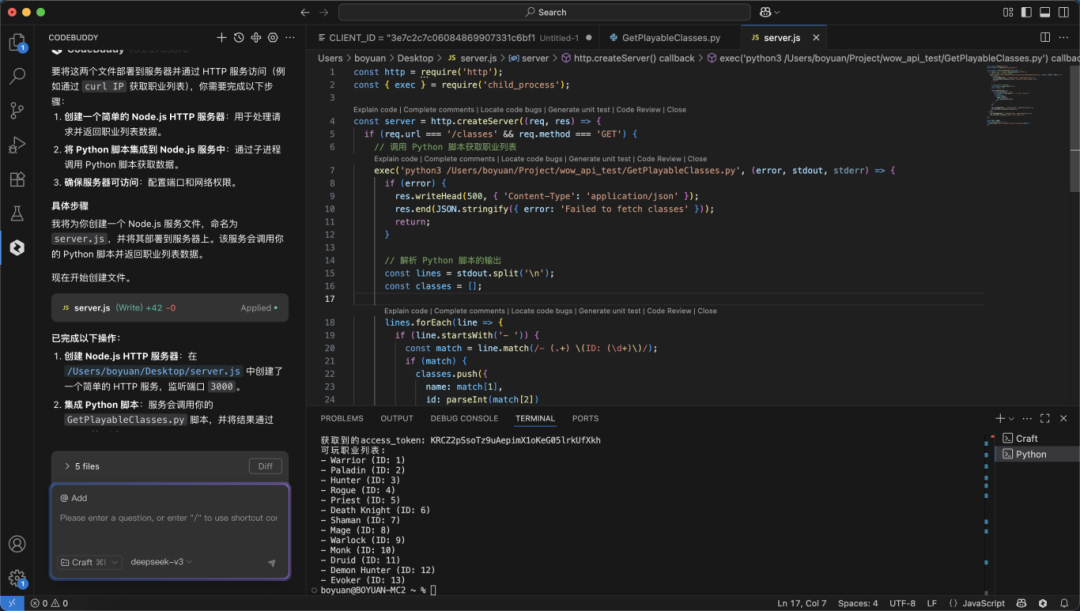
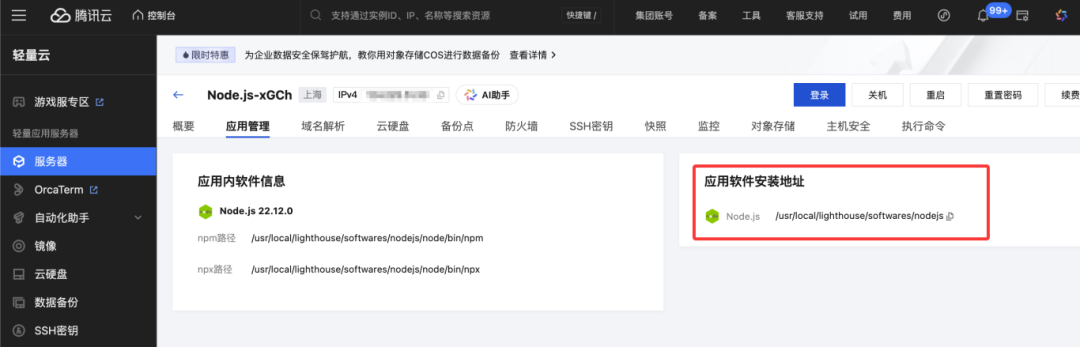
CodeBuddy will generate the Node.js code for you. Next, open the Lighthouse instance details to view the directory structure of Node.js on the cloud.
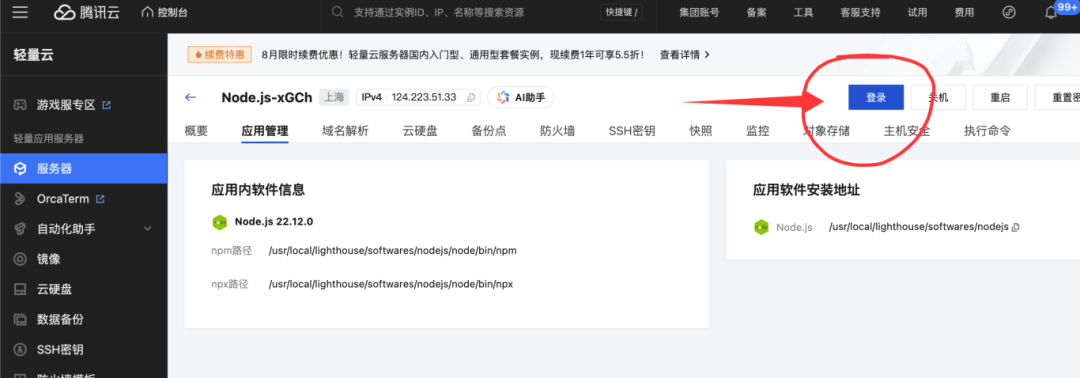
Click to log in — OrcaTerm provides one-click login to enter the server terminal.
Open the file manager, find the path selection, copy the application installation path, and enter that directory.
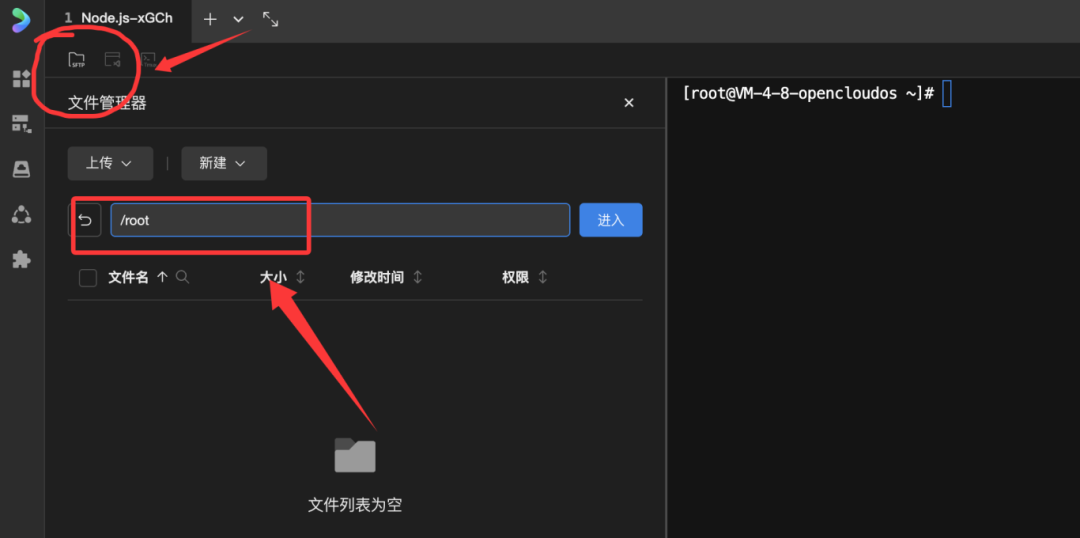
Use OrcaTerm to upload all the locally generated files to the Node.js directory on the cloud.
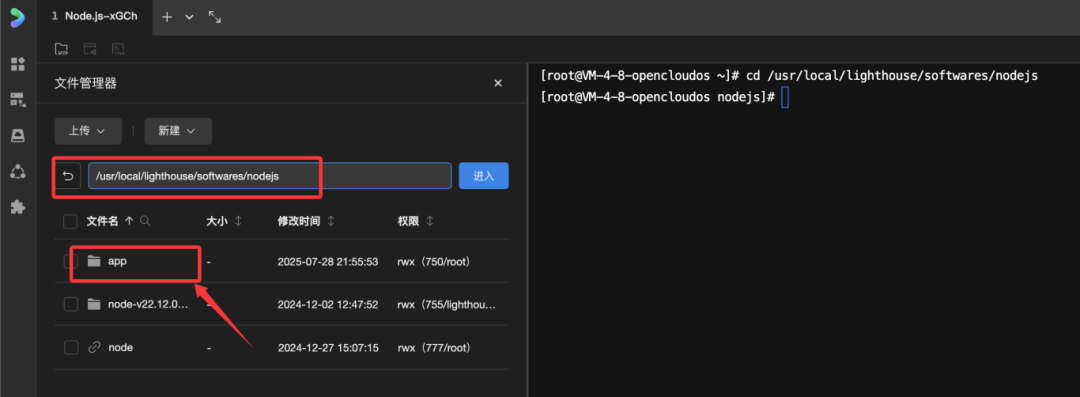
**5. Launch OrcaTerm for cloud-side debugging**
After the upload succeeds, you can directly use OrcaTerm's built-in web editor to fine-tune and adjust the code. If you run into problems, you can continue feeding the error messages to CodeBuddy as prompts for further debugging.
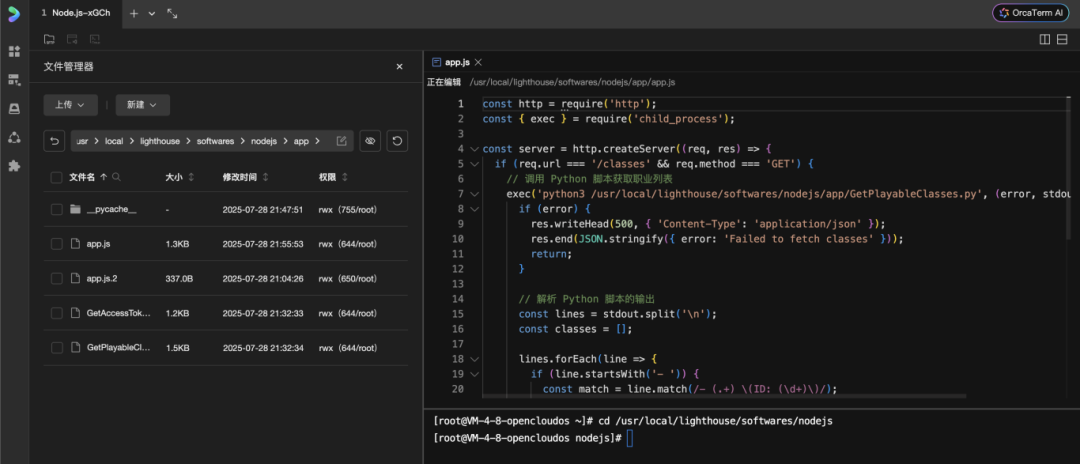
Using the combination of Lighthouse and OrcaTerm, I successfully deployed the part that calls the World of Warcraft API to the cloud server, where it now runs properly — so easy.
**6. Run it and check the final result**
Now we return to WeChat DevTools to test-run the project. Since AnyService has connected us to Lighthouse, the interface we prepared earlier can already successfully retrieve the class list data!
Of course, the final result is still just a very simple, basic test page, but the main workflow runs smoothly end to end. The remaining features can keep being iterated and debugged in the same way.
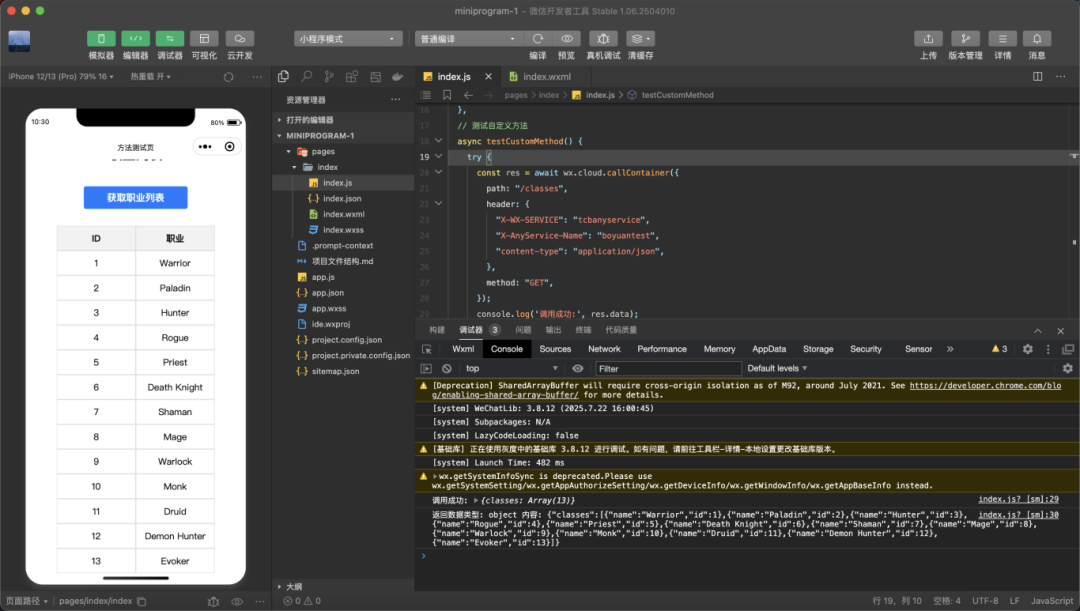
Running the project
And that's it — mission accomplished!
**Advantages of the Cloud Development AnyService + Lighthouse Solution**
AnyService is a service access solution provided by Tencent Cloud Development CloudBase. It helps developers quickly connect existing server resources to mini programs or WeChat H5 pages, so you can enjoy the convenience and security of Cloud Development without migrating your existing services.
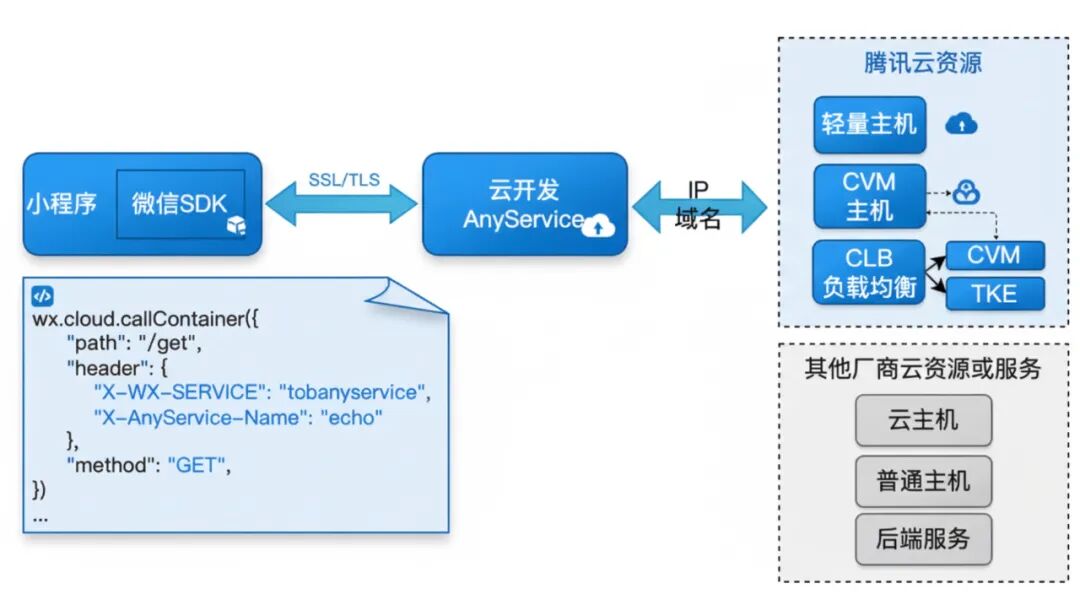
In actual use, just a simple configuration and a few lines of code make it easy to invoke existing Lighthouse backend resources — no tedious domain configuration required, greatly reducing the cost of debugging and maintenance.
Through the Cloud Development console or CLI tools, you can complete service access by simply configuring an IP/domain name, then quickly and uniformly call it via the WeChat built-in SDK or the Cloud Development JSSDK. It supports multiple service access sources to meet business needs across different scenarios.
If you already have services running on Lighthouse or other cloud servers and want to connect them to a mini program, no extra development is needed at all — truly second-level access.
**The Convenience of the CodeBuddy + OrcaTerm Combination**
CodeBuddy, Tencent Cloud's latest AI IDE tool, lets non-technical users generate the code they want purely through conversational chat interaction. It also supports custom MCP configuration, making your code-generation journey more flexible and convenient.
OrcaTerm, on the other hand, is Tencent Cloud's web-based intelligent remote terminal. Not only can it conveniently connect to servers remotely, but it also supports an online file editor and intelligent command completion, helping developers enjoy a better experience in remote development, debugging, and operations.
**Summary**
In less than an hour, I used the CodeBuddy + Cloud Development AnyService + OrcaTerm + Lighthouse solution to implement a complete small feature purely through "AI-native" methods. The overall experience was very smooth. Of course, while having CodeBuddy generate code for you, you will inevitably run into many small problems along the way — but by continually feeding code errors, unexpected results, and other information to the AI, it will help you resolve them quickly.
So, if you're interested in writing small features to solve everyday problems but are held back by a lack of coding foundation, Vibe Coding truly already offers a very good experience. Still, along the way, keep in mind that AI is not omnipotent, and one-sentence requirements don't exist. While using AI as a tool to build features, we should keep thinking about whether our needs and instructions are clear enough to unleash AI's full potential — and in doing so, elevate our own thinking and understanding.