

Have you ever had this experience? Your head is full of ideas — you want to build your own Mini Program, personal blog, or a small utility website — but the moment you think about finding a front-end and back-end, buying a server, configuring the environment, and getting it deployed and live… your head starts spinning and you just give up on the idea? 🤔
Today, I'm going to share a supercharged combo that takes efficiency to the next level — Tencent Cloud CloudBase + CodeBuddy — so you can turn your ideas into live online projects quickly without spending a penny (the free tier is amazing!) or buying a server. It's a true blessing for students, independent developers, and startup teams~

I've recorded a detailed video tutorial that walks you through the whole process from zero to one — I guarantee you'll master it!
A New Way to Track Anime: A Cute Girl Programmer Builds an Anime Tracker with CloudBase + CodeBuddy in 8 Minutes!!!
A New Way to Track Anime: A Cute Girl Programmer Builds an Anime Tracker with CloudBase + CodeBuddy in 8 Minutes!!!
Project Experience Sharing
This time, I'm demonstrating an [Anime Tracking TODO List]. Let's first take a look at the demo interface:
Demo interface
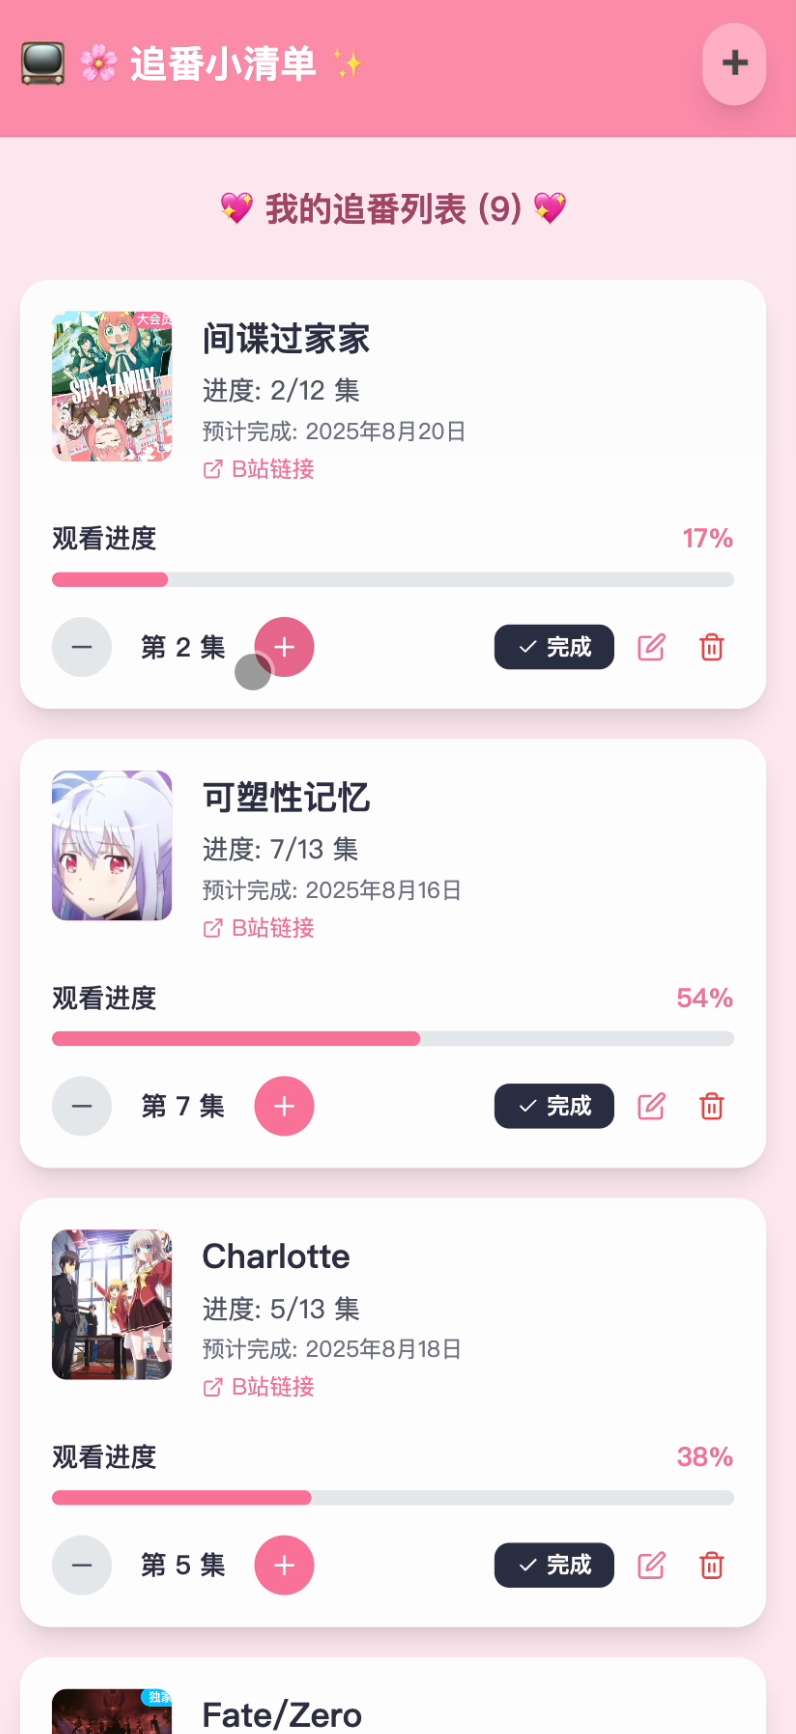
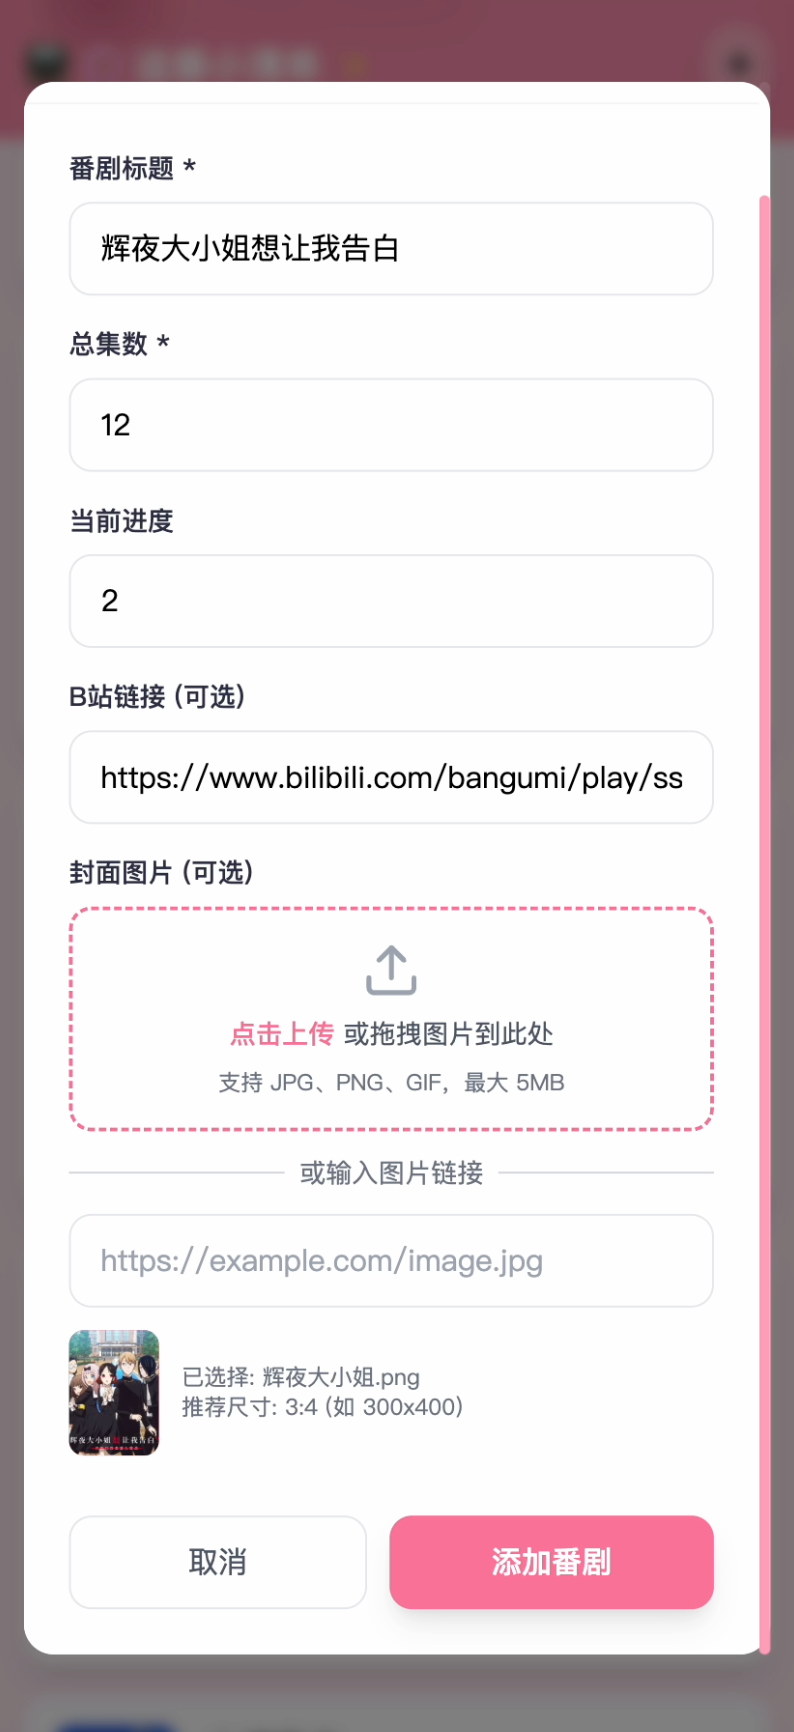
Although it's a small example, this tutorial covers the entire process from development to launch 😁
Next, let's look together at where the CloudBase and CodeBuddy combo shines brightest, and how satisfying it is to have the built-in MCP in the editor seamlessly connected with the platform ecosystem~~
👍 TL;DR
- Environment configuration? Not needed!
CloudBase comes with Cloud Functions, a database, storage buckets, and static hosting out of the box.
You don't need to install or configure Nginx or MySQL yourself — it's like having an ops expert set up all the back-end infrastructure for you.
- Don't know Java back-end? Cloud Functions has you covered!
CloudBase's Cloud Functions let you write back-end APIs in simpler languages (such as Node.js or Python), perfectly replacing complex Java Spring Boot setups and the like.
You don't need to build a complete back-end framework — each function is an independent API, so you can focus purely on writing business logic. Combined with CodeBuddy, you just describe your requirements in natural language and it generates usable function code for you.
Even complete beginners can get started quickly!
- Deployment and launch? One sentence!
Once the code is written, just type the keyword "deploy the project" in the CodeBuddy dialog, and your project is automatically published.
CloudBase will even give you a free second-level domain, so you can instantly share it with friends and show off — maximum sense of achievement!
Quick Start
- CloudBase: Your All-in-One Cloud Development Back End
First, head over to the CloudBase product website.
(Go to the platform👉https://tcb.cloud.tencent.com/)
After logging into the Cloud Development console, enable a CloudBase environment (choose the Personal plan — the free quota for new users is more than enough!)
Provisioning page👉https://buy.cloud.tencent.com/lowcode?buyType=tcb
Once enabled, you'll have a powerful "cloud development toolbox"! Let's see what it contains:
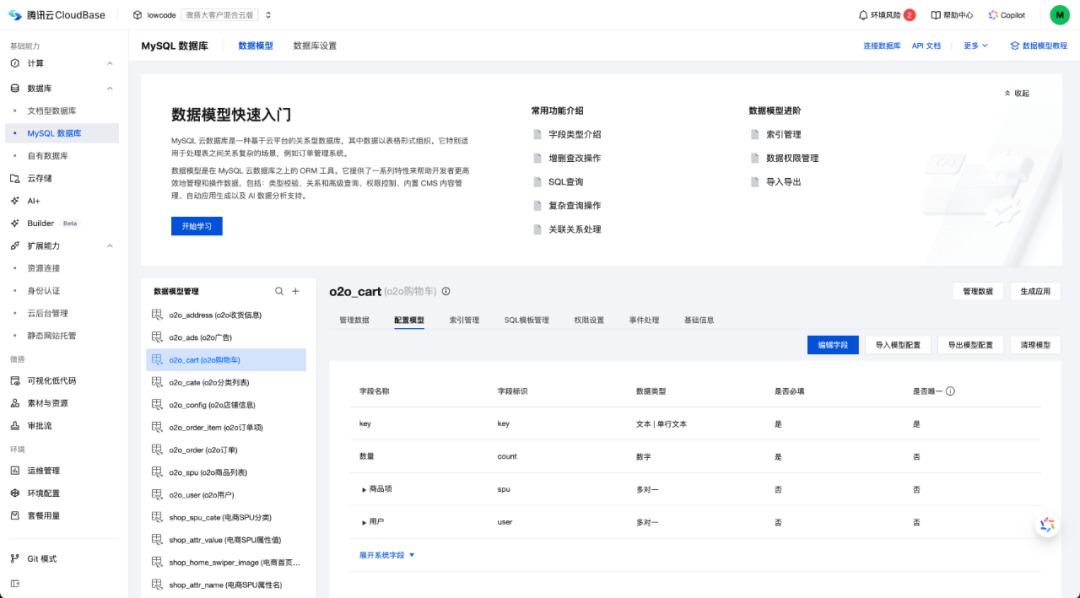
Product interface
At its core, it helps us solve these three things:
-
Compute resources (back end): Whether you're writing simple Cloud Functions or deploying full Docker applications (Java/Go), there's no need to worry about servers — deployment, scaling, and capacity management are automatic.
-
Data storage: The built-in database and cloud storage are ready to use out of the box, with visual data management and built-in CDN acceleration for files.
-
One-click launch: Deploy front-end projects to the public internet with a single command using static hosting.
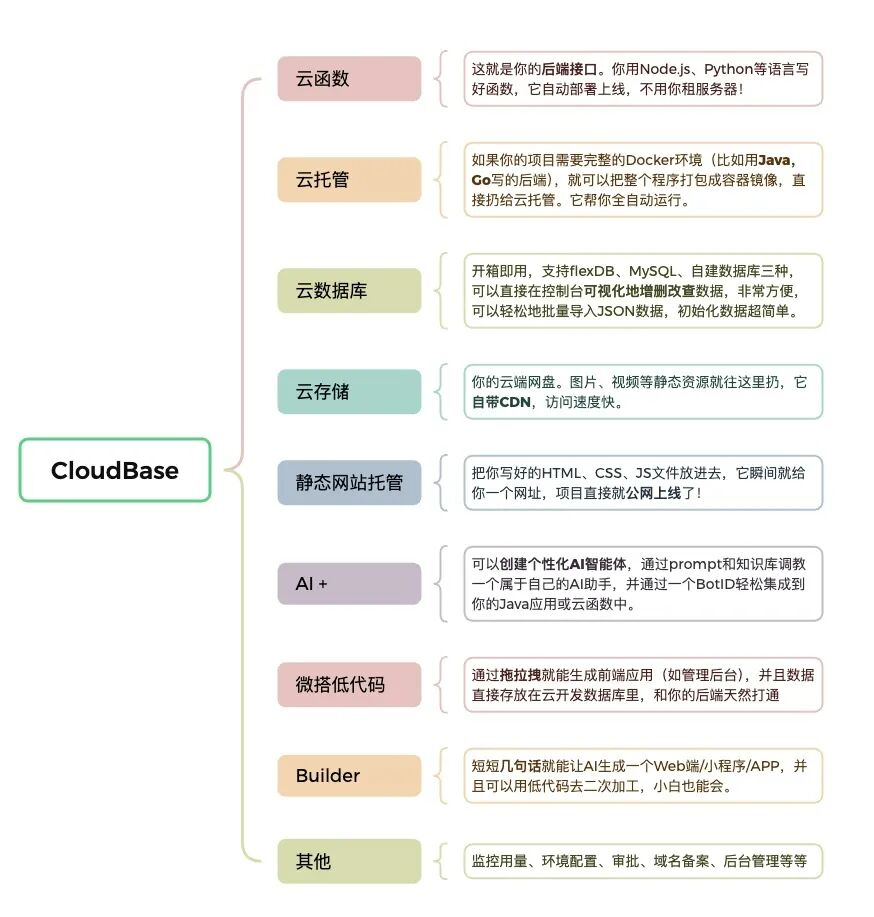
An introduction to CloudBase
In short, from database and back end to front-end deployment, CloudBase provides a one-stop solution. It handles all the dirty work of environment configuration and deployment, so developers only need to focus on handling business features — doubling your efficiency!
- CodeBuddy: Your AI Coding Partner
Having a powerful platform isn't enough — writing the code itself can also be a challenge. That's where CodeBuddy comes in! (Download it👉https://www.codebuddy.ai/)
CodeBuddy is an AI editor with a powerful feature: it comes with the Tencent Cloud CloudBase MCP built in.
What does that mean?
It means you can command your cloud platform directly using plain language — completing all kinds of environment configuration, front-end and back-end code, and publishing and launching your project. It's basically a one-stop service 🤤
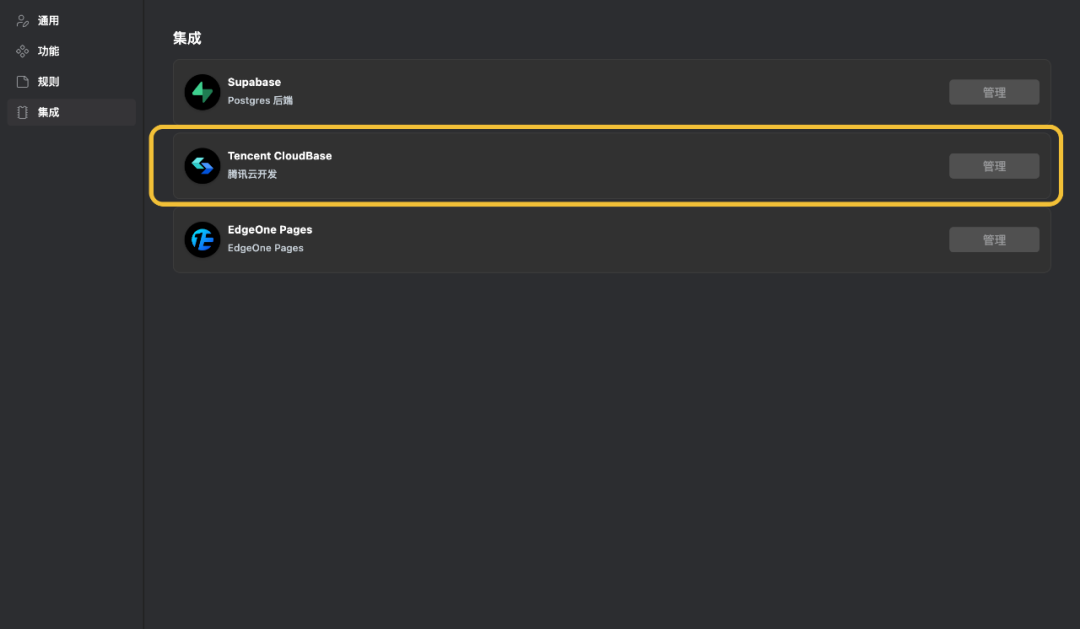
The Tencent Cloud CloudBase MCP is built in
Before we start, go here to configure the MCP -> manual configuration:

Configuring the MCP
Add the following "mcpServers":
{
    "mcpServers": {
      "cloudbase": {
        "disabled": false,
        "timeout": 60,
        "type": "stdio",
        "command": "npx",
        "args": [
          "npm-global-exec@latest",
          "@cloudbase/cloudbase-mcp@latest"
        ],
        "env": {
          "INTEGRATION_IDE": "CodeBuddyManual"
        }
      }
    }
}
The terminal environment needs to meet: Node.js ≥ v18.15.0.
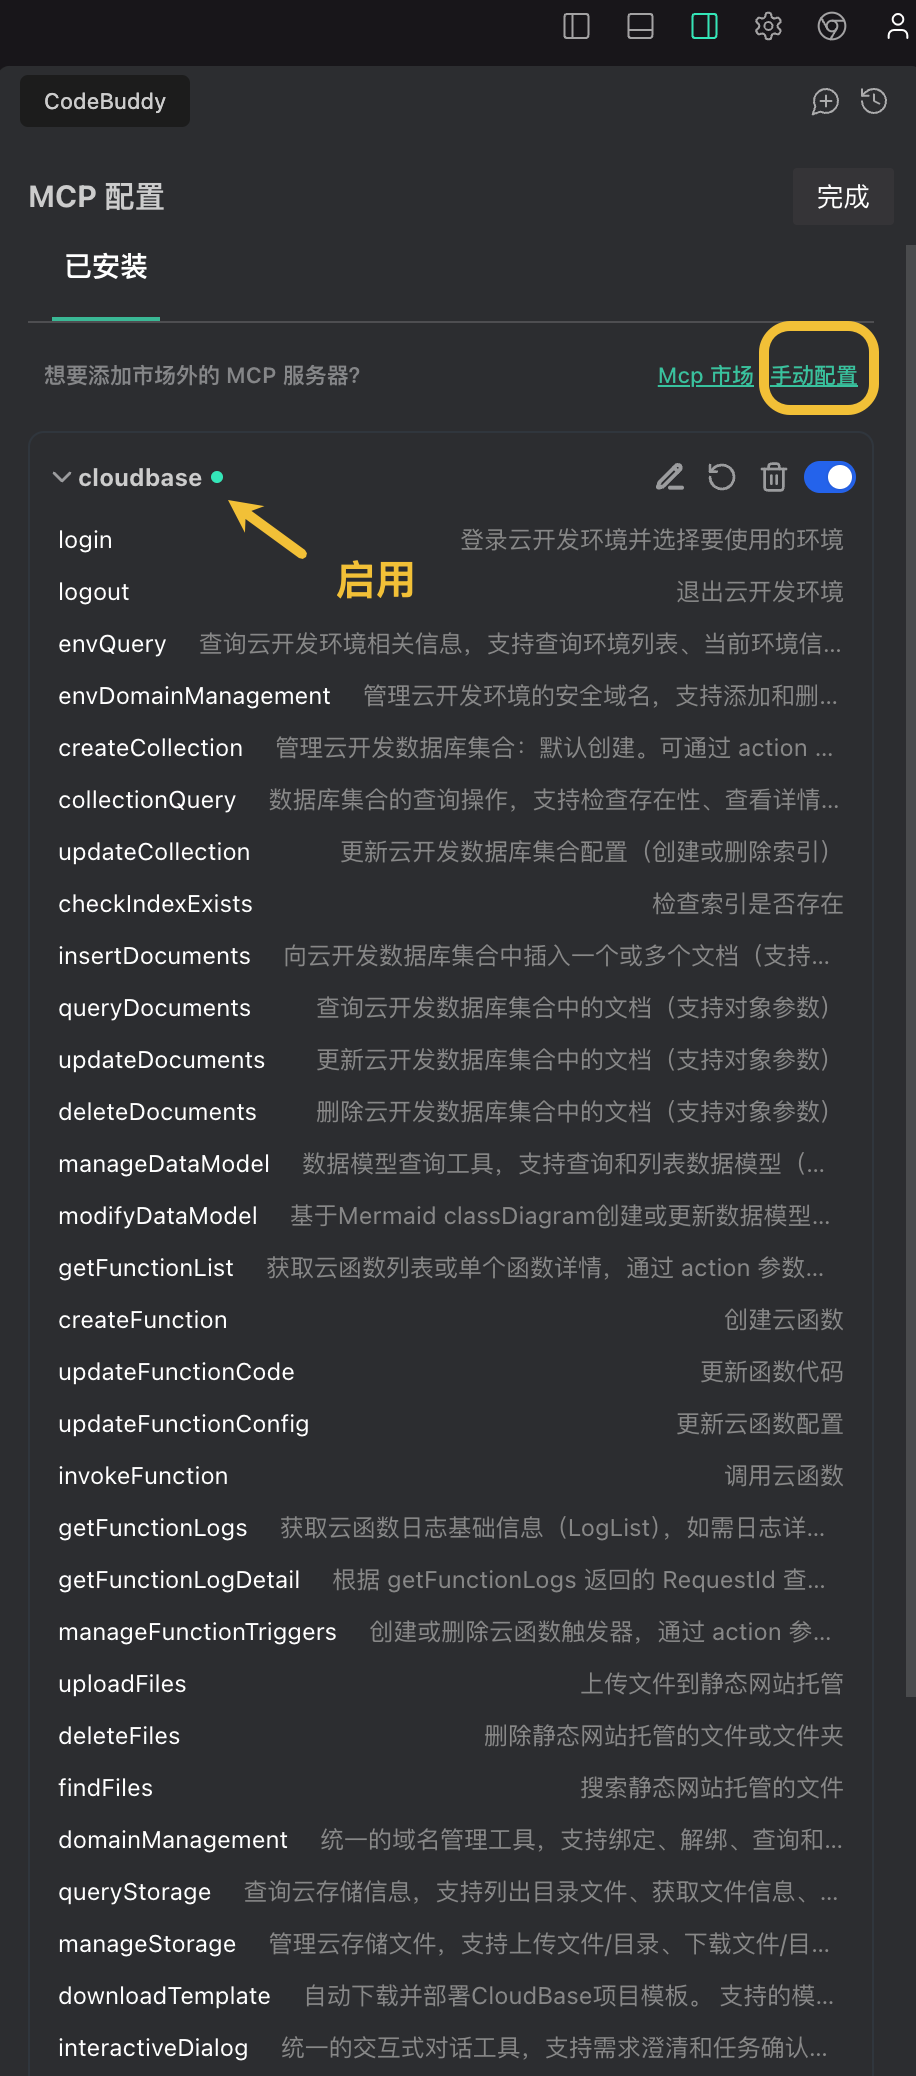
Enabling the CloudBase MCP
Learn more about the CloudBase AI ToolKit👇
Official docs:
https://docs.cloudbase.net/ai/cloudbase-ai-toolkit/
Open-source repo
https://github.com/TencentCloudBase/CloudBase-AI-ToolKit
IDE setup guides
https://docs.cloudbase.net/ai/cloudbase-ai-toolkit/ide-setup/cursor
Project Tutorial Next, let's create a project to give it a try 🤗
Step 1: Clarify your requirements
When crafting the prompt, it's best to follow the Spec principles. Here are my rules:
Please generate a mobile-oriented anime-tracking web application, and create it based on a CloudBase template:
- Tech stack
-
Front-end: react + tailwindcss + responsive
-
Back-end: Tencent Cloud Cloud Functions
-
Database: Tencent CloudBase document database
- Core features
-
Add an anime: title, total episodes, current progress, Bilibili link (optional cover image upload)
-
Manage an anime: choose to mark an anime as completed, or delete it
-
Smart calculations: estimated completion date (based on average episodes watched per day)
-
Progress percentage (shows a progress bar)
-
Full CRUD features
-
Image upload: use CloudBase's static storage for file upload/download
- Anime-style touches
-
Theme color: (sakura pink)
-
Copy: use emoji combined with text
-
Empty-state message: "There are no anime here yet~ Go on a date with your waifu!"
- Easter egg features
- Randomly show an uplifting Japanese quote every time the page loads
- Deployment requirements
-
Configure the database based on the [bAnimation] collection name
-
Deploy the Cloud Functions
- Launch requirements
-
Automatically configure the CloudBase database
-
Generate an accessible temporary domain
-
Output a one-click deployment script
Using keywords like "CloudBase" precisely triggers CodeBuddy to generate the project structure following cloud development best practices.
(Check out the project template code packages here👉https://docs.cloudbase.net/ai/cloudbase-ai-toolkit/templates)
Once the project is generated, you can see a "cloudfunctions/" folder at the root directory — this is where Cloud Functions are stored. Think of it as your project's back-end interfaces, where you operate on the database.
Step 2: Deploy the Cloud Functions
After the project is created, we talk to the AI and ask it to log in and select the CloudBase environment we just created.
❗️For the following operations, make sure to execute in Craft mode in the editor.
First, enter the login command:
Log in to Cloud Development
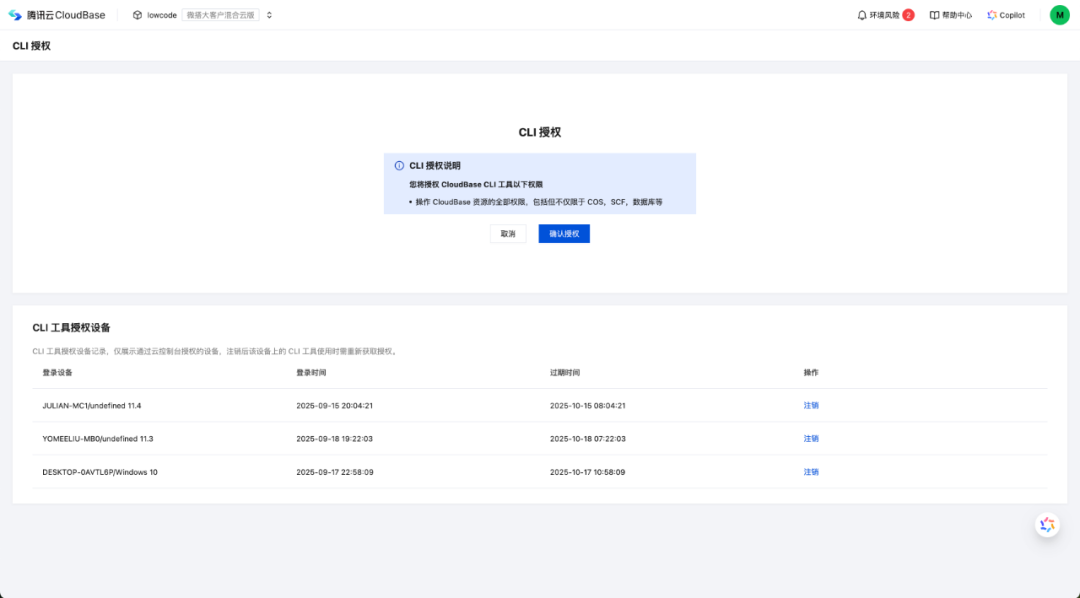
Then watch for the browser popup — if a permission page appears, click to confirm authorization:
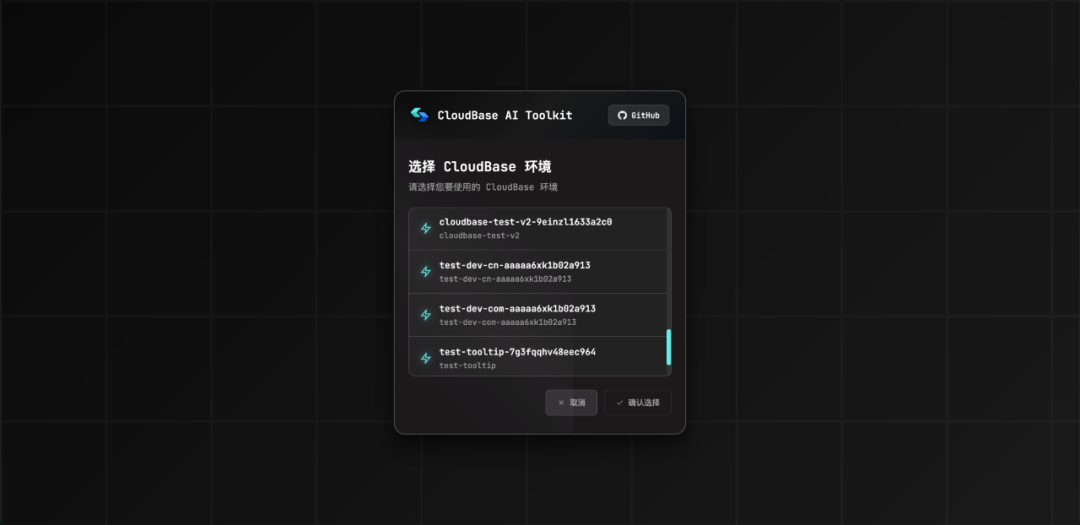
Select the environment you want to use:
Once the environment is selected, command the AI to deploy:
Deploy the Cloud Functions
It will automatically call the MCP Tool to deploy the Cloud Functions.
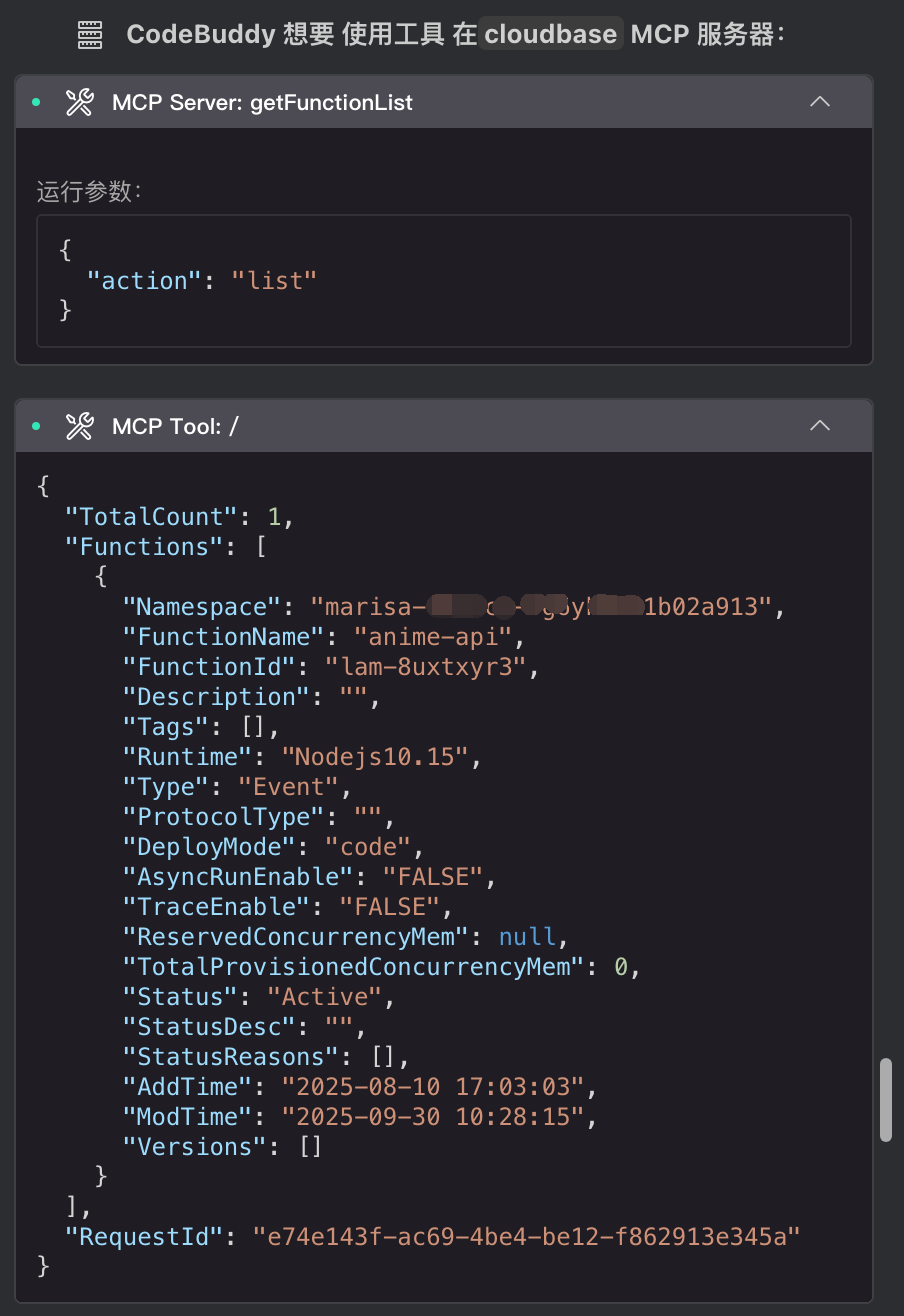
The Cloud Function deployment process
After a successful deployment, head to CloudBase Cloud Development Platform -> Compute -> Cloud Functions, and you'll see the functions that were just deployed.
Online logs, monitoring, and code are all displayed at a glance:
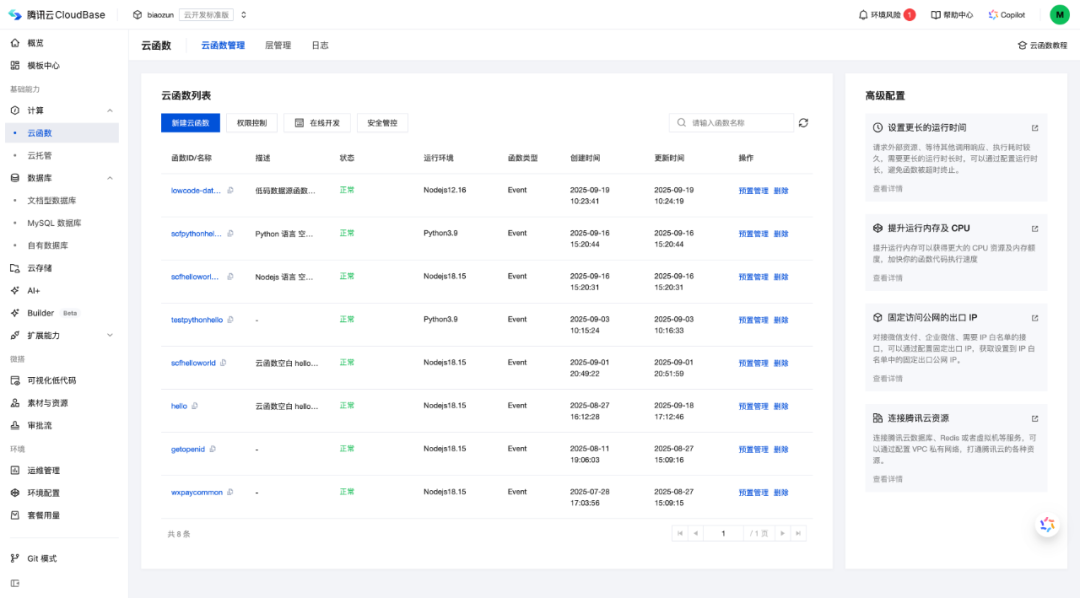
Cloud Function management
👉 Learn more about Cloud Functions: https://docs.cloudbase.net/cloud-function/quick-start
Step 3: Upload the database
How could an application not have a database? Let's initialize the database 😘I'll demonstrate two methods:
- Method 1 (AI-generated)
Directly ask the AI to generate some test data for the anime tracking list in JSONL format, then upload it via code.
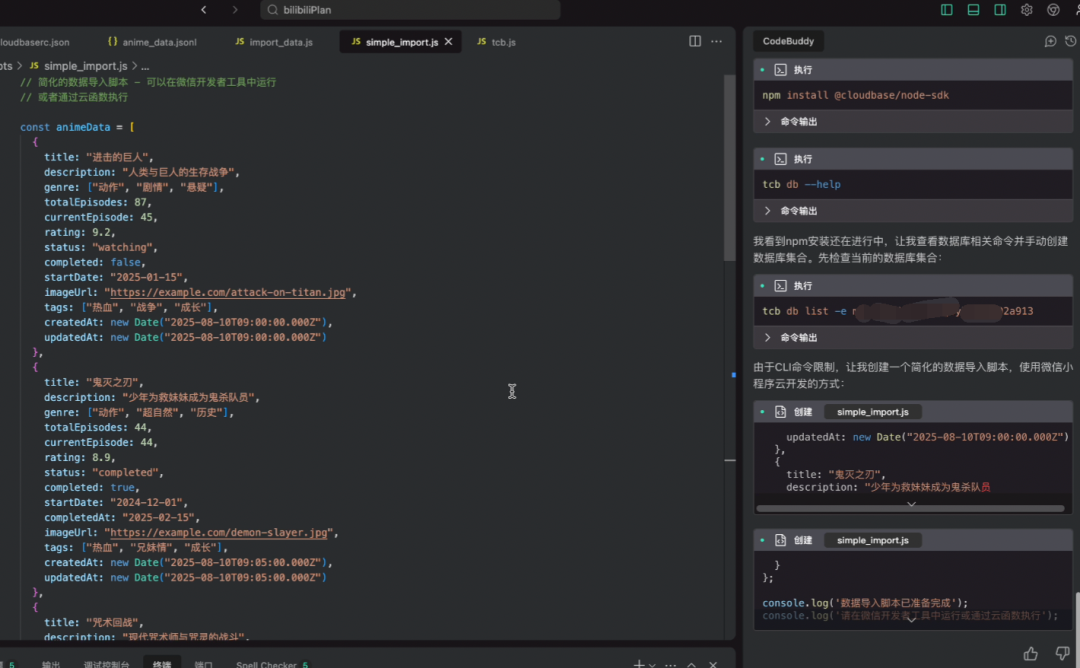
Generated data content
- Method 2 (manual operation)
In CloudBase Cloud Development Platform -> Document Database -> New Collection, manually create a dataset, choose the appropriate permission in the permission settings, and then directly upload a JSON file to bulk-import the data. Super convenient.
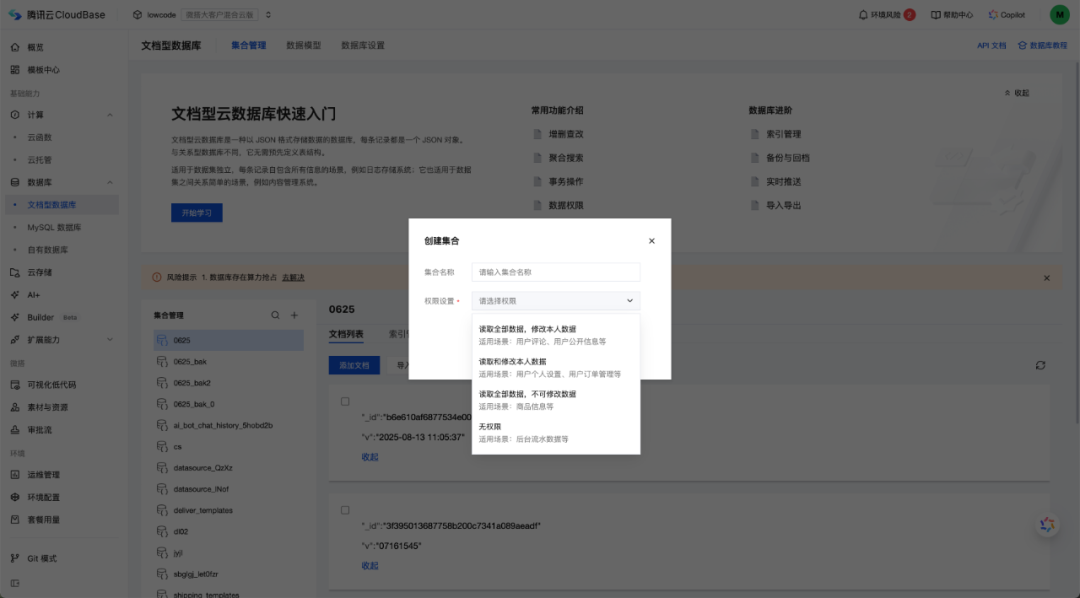
Creating a data collection
Bulk-importing JSONL data:
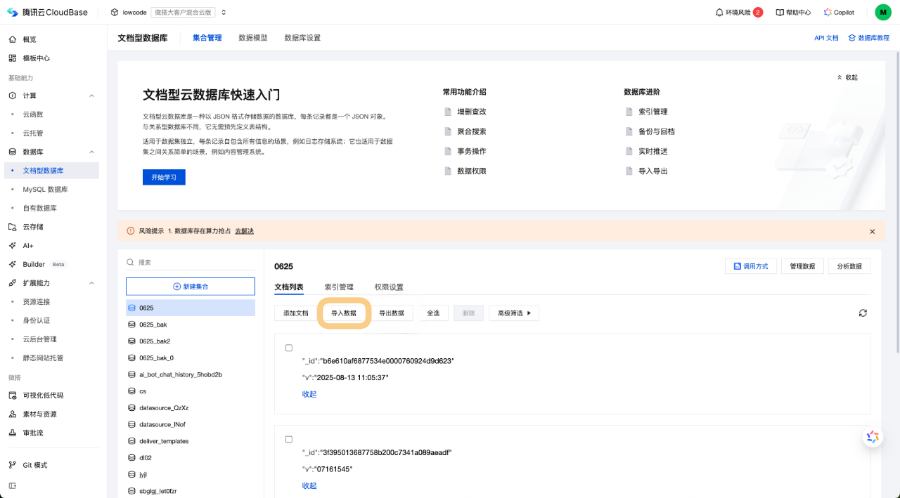
Importing data
Remember to check whether the database collection name used in your project code matches the one you just created on the platform 🥳
const currentAnime = await db.collection('your database name').doc(id).get()
👉 Learn more about data models: https://docs.cloudbase.net/database/sdk-init
Step 4: Connect cloud storage
Next, let's demonstrate a file upload to experience CloudBase's cloud storage capabilities. In the CloudBase console -> Cloud Storage, designate where you want to store files, and note down the folder path.
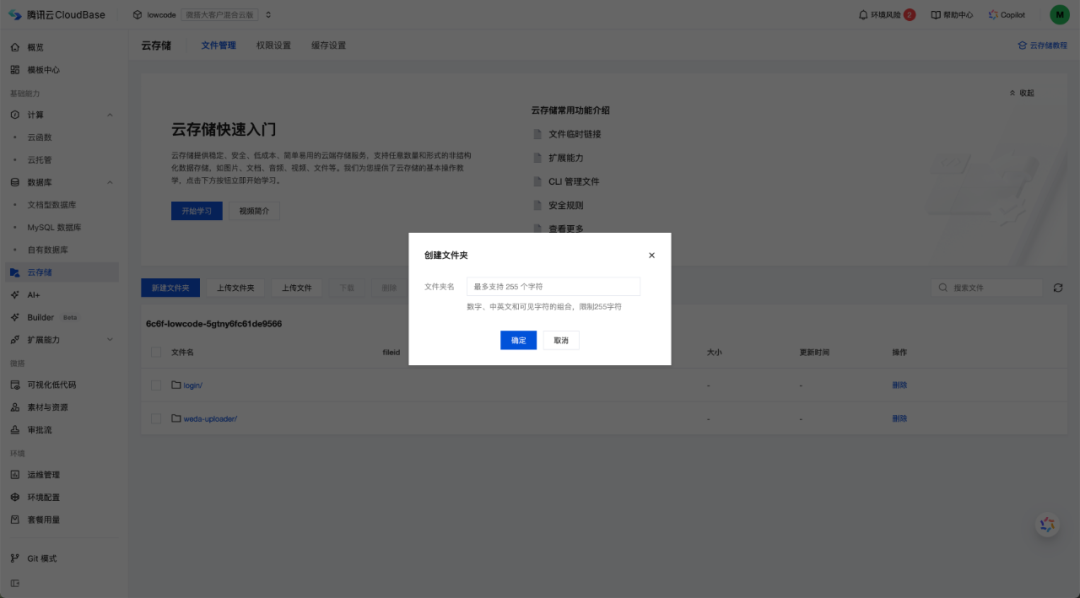
Specifying the folder path
Then, tell CodeBuddy what you need.
For example, I fed it this clear instruction:
Please help me write a piece of code that uses the Tencent Cloud CloudBase SDK to achieve the following:
-
Upload the image selected by the user to the specified cloud storage directory: "your path"
-
After a successful upload, be able to obtain the file's online access link (URL)
-
Return this URL to the front-end page for display
Almost instantly, CodeBuddy generated a very standard, ready-to-use piece of code! It precisely invoked the CloudBase SDK, handling the complete flow of file selection, async upload, and success callback.
Here's the core code snippet it generated:
async function getDownloadURL(event) {
  const { fileID } = event
  if (!fileID) {
    return {
      success: false,
      error: '缺少文件ID'
    }
  }
  try {
    const result = await cloud.getTempFileURL({
      fileList: [fileID]
    })
    if (result.fileList && result.fileList.length > 0 && result.fileList[0].tempFileURL) {
      return {
        success: true,
        downloadURL: result.fileList[0].tempFileURL
      }
    } else {
      throw new Error('获取下载链接失败')
    }
  } catch (error) {
    console.error('云函数获取下载链接失败:', error)
    return {
      success: false,
      error: error.message
    }
  }
}
Choose an image and upload it to try — it automatically goes up to the cloud! ☁️
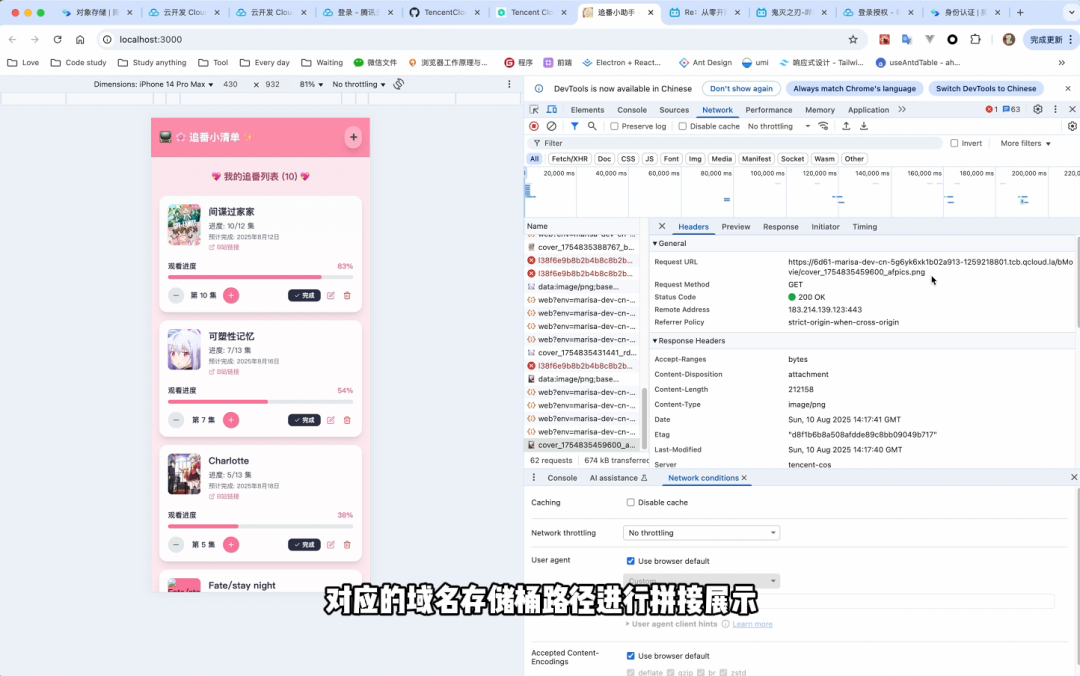
We don't need to handle complex file processing or path concatenation ourselves — CodeBuddy will connect to the Cloud Development platform and take care of everything for you 🤗, and resource access is super fast~
🔍 Technical details
Under the hood, it calls the "getTempFileURL" method, because the CloudBase SDK handles everything perfectly. For you, the experience is:
-
Files upload to the cloud instantly
-
Links automatically come with global CDN acceleration
-
No need to worry about server configuration
This means your files are not only securely stored in the cloud — more importantly, they automatically join CloudBase's global CDN acceleration network, so whether your users are in China or overseas, they all enjoy fast access speeds.
Step 5: Debug and optimize
Along the way, we can start the project locally to check the results. CodeBuddy supports local project preview, which is very convenient.
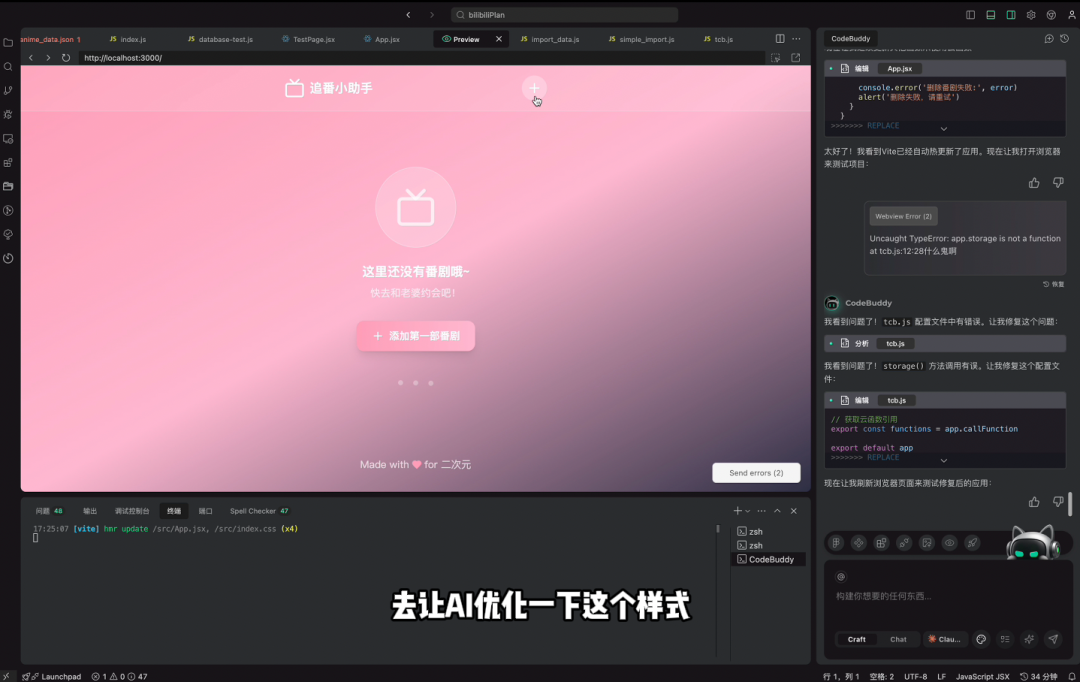
CodeBuddy local preview
After polishing the styles, open the browser and hit F12 to take a look:
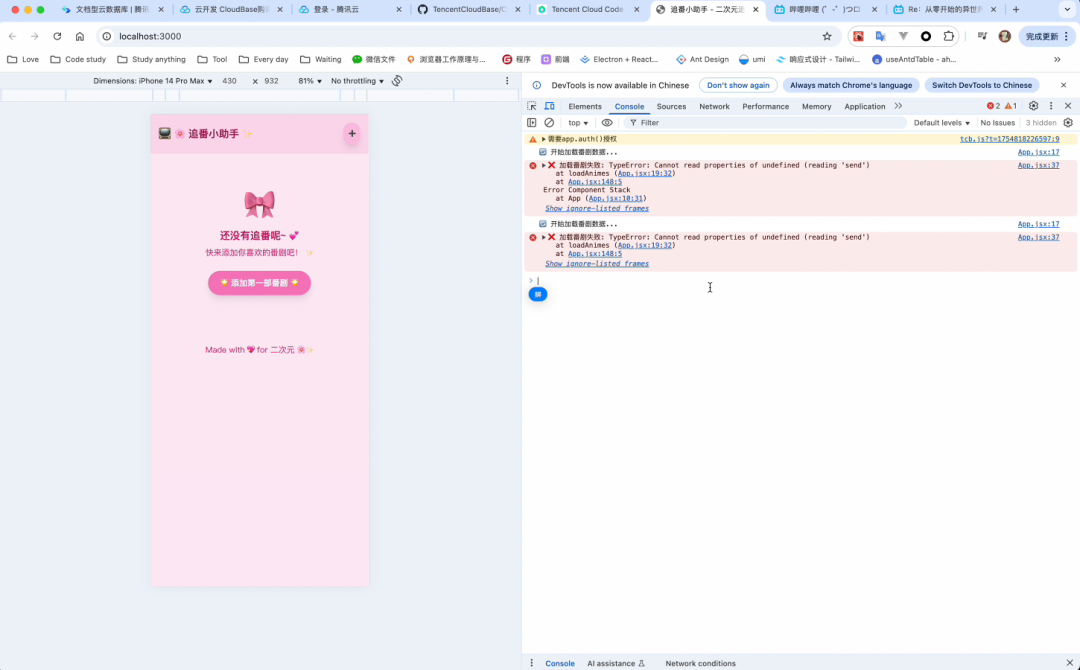
Local startup error
Got an error in the console? 🤡
Simply copy and paste the red error message to the AI — it can analyze the cause and give you a fix.
There's also one hugely important point! If you modify a Cloud Function's code locally, merely restarting locally won't help — you must redeploy it to the cloud for the change to take effect!
Remember the Cloud Function change workflow: modify the Cloud Function -> redeploy -> refresh the page.
Step 6: Deploy with one sentence
Once all features are done, the most satisfying step comes! Just give CodeBuddy the command:
Deploy the project
Then it will upload your project to the corresponding environment's static website hosting. At that point, your project is successfully deployed and live — no need to buy a server at all~~
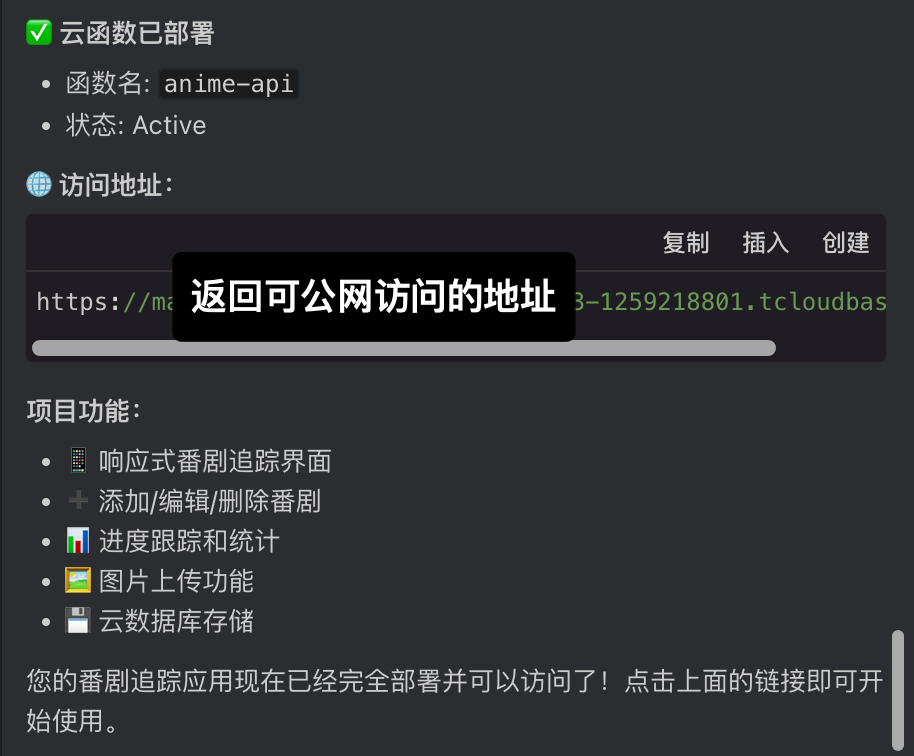
The public access URL provided by CodeBuddy
Later, you can change the domain and complete ICP filing on the Cloud Development platform as needed.
Now, we can open the temporary domain provided by CloudBase in the browser — a complete, data-backed, interactive application is already running online!

Accessing it online
👉 Learn more about CLI static website hosting: https://docs.cloudbase.net/cli-v1/hosting
Summary and Reflections Going through this whole process, my biggest takeaway is: development tools have truly evolved!
This completely upends the traditional development model.
-
Before: You needed to assemble a team — front-end, back-end, and ops each working separately, with high communication costs and complex environment configuration.
-
Now: You only need one CloudBase platform + one CodeBuddy editor, and a single person can easily handle the whole journey from idea to launch.
This efficiency gain is visible to the naked eye, reflected in every stage:
| Stage | Traditional approach | With tools | Efficiency gain |
|---|---|---|---|
| Environment setup | Purchase and configure a server, taking hours | Create-and-use, done in minutes | Hours/days → ~1 minute |
| Back-end development | Build a complete framework, handle complex configuration | Write Cloud Functions, focus on business logic | Days → hours (with AI) |
| Database | Install and maintain yourself, handle backups and security | Built-in database, out of the box, visual management | Hours → seconds (auto-ready) |
| File storage | Build your own storage, manually configure CDN | Built-in storage with automatic CDN acceleration | Hours → seconds (auto-config) |
| Project deployment | Manually upload code, tedious and error-prone process | One-click MCP-based command deployment, fully automated | 10-30 minutes → ~1 minute |
| Full process | Requires multi-role collaboration, sequential handoffs | A solo developer completes it all in one go | Days/weeks → hours/days |
For different people, this means:
-
Students: A magic tool for creating impressive coursework, graduation projects, innovation projects, or even your own small product at zero cost — no more worrying about finding teammates or configuring environments.
-
Independent developers: It lets you focus intensely on creativity and business logic rather than tedious configuration and operations. One person is a whole team.
-
Startup teams: You can validate product ideas at lightning speed, iterate and make mistakes with the lowest cost and fastest time, and seize market opportunities.
-
Enterprises and companies: Transform heavy IT infrastructure burdens into lightweight R&D and operations costs, while naturally gaining enterprise-grade security and high-availability guarantees.
About CloudBase AI ToolKit CloudBase
Official site: https://tcb.cloud.tencent.com/
Cloud Development console: https://tcb.cloud.tencent.com/dev
Documentation site: https://docs.cloudbase.net/
Other tutorials
CloudBase AI ToolKit Launch: Quick-Start Guide & New Feature Walkthrough